
Hi there I’m Vanessa and if you’re here from Made by Rae, welcome to Punkin Patterns! Glad you could stop by and please take a look around. While you’re here take a minute to enter my fabric giveaway – In honor of Celebrate the Boy month, I’ll be giving away 1 yard of Curious George Fabric. Enter here.
Being a mother to both a son and a daughter, I know how easy it is to sew for girls and how it seems that boys are left behind. I love that Dana and Rae have brought together so many talented women for a second time to make and create for our boys. I’m so pleased to be a part of Celebrate the BOY month.

I love sewing and making things for my son. He’s still at the age where he’s excited about things I make him and about how it’s made. He’s always eager to test it out or to wear it as soon as it’s done.
 |
| Car and Truck Stamps |
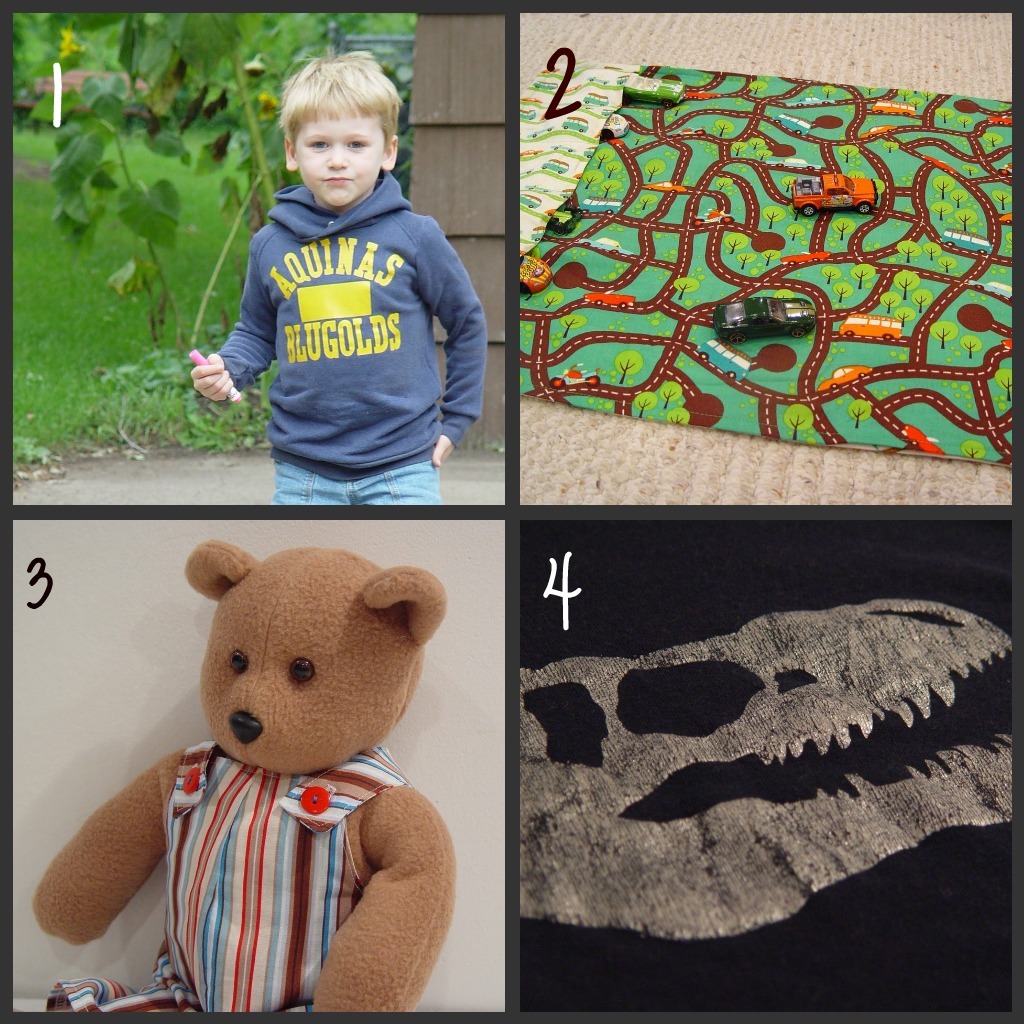 |
| 1. Upcycled Hoodie, 2. Car Mat, 3. Mr. Bear, 4. T-Rex Shirt |
For quite some time I’ve had an idea for this bag in my head. I went through many variations and options before I finally came up with this:
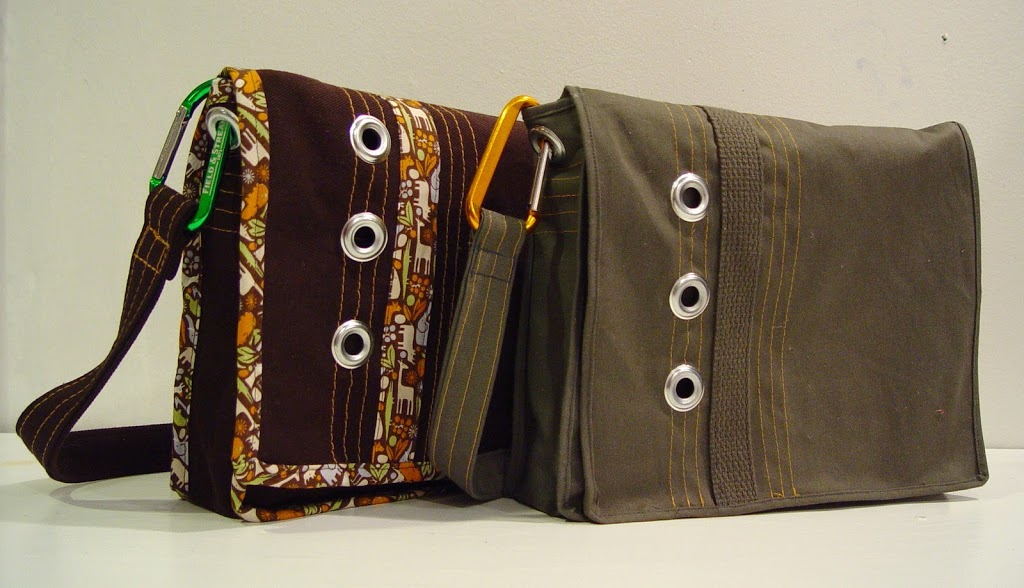
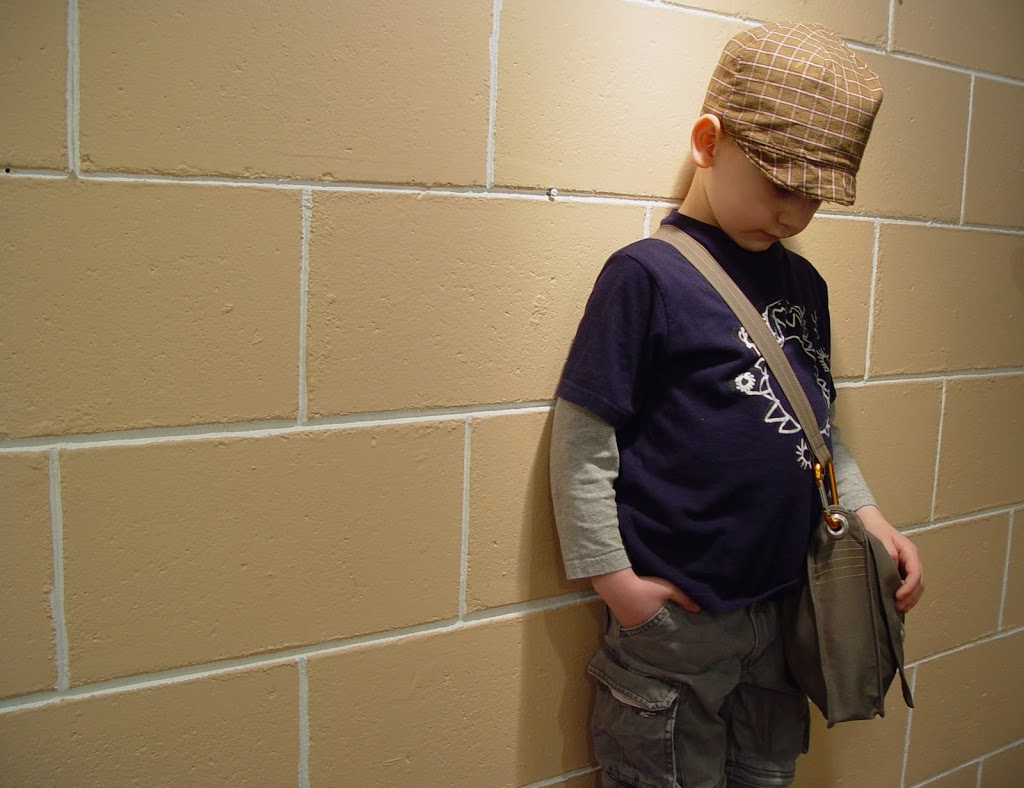
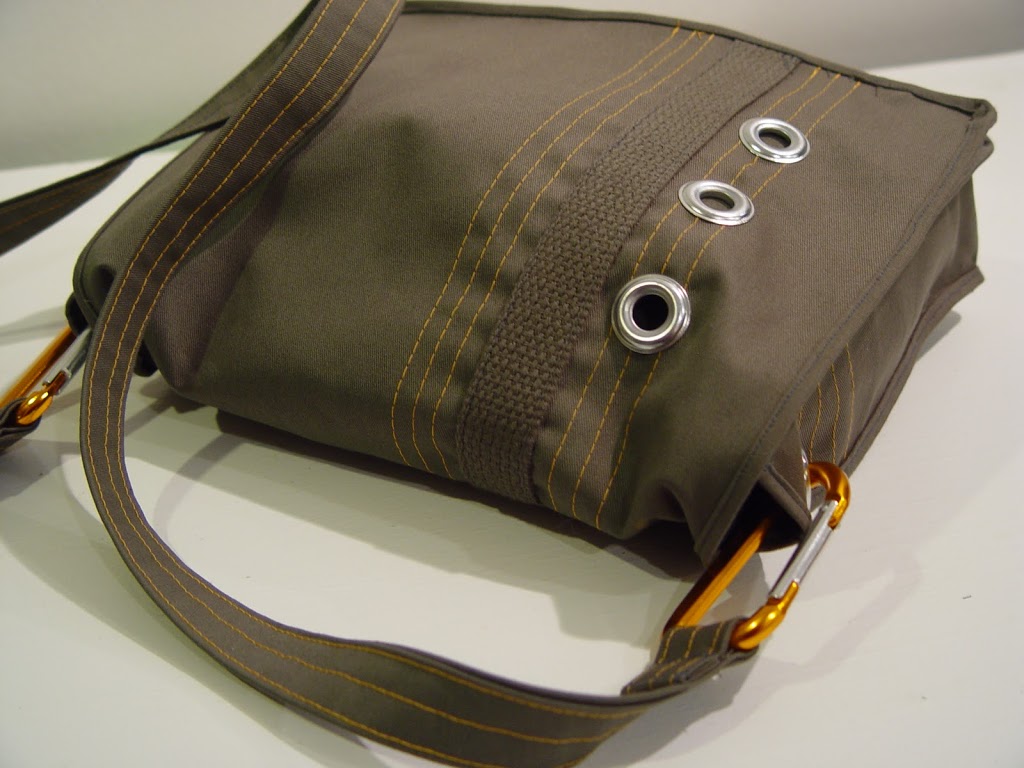
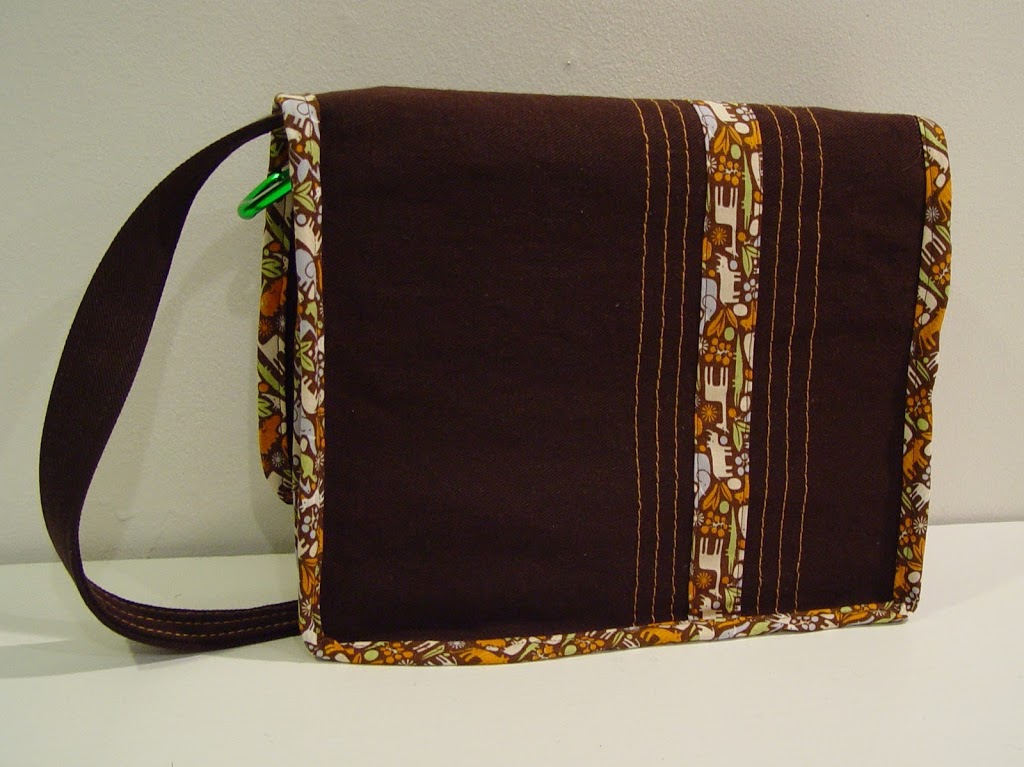
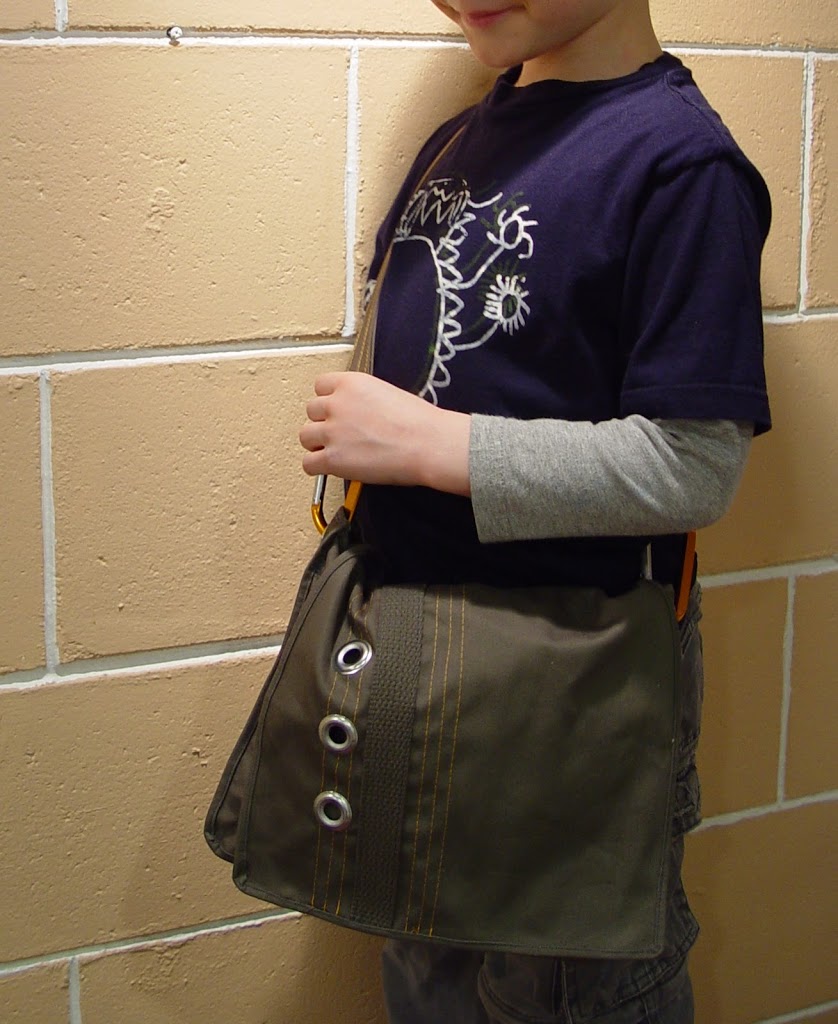
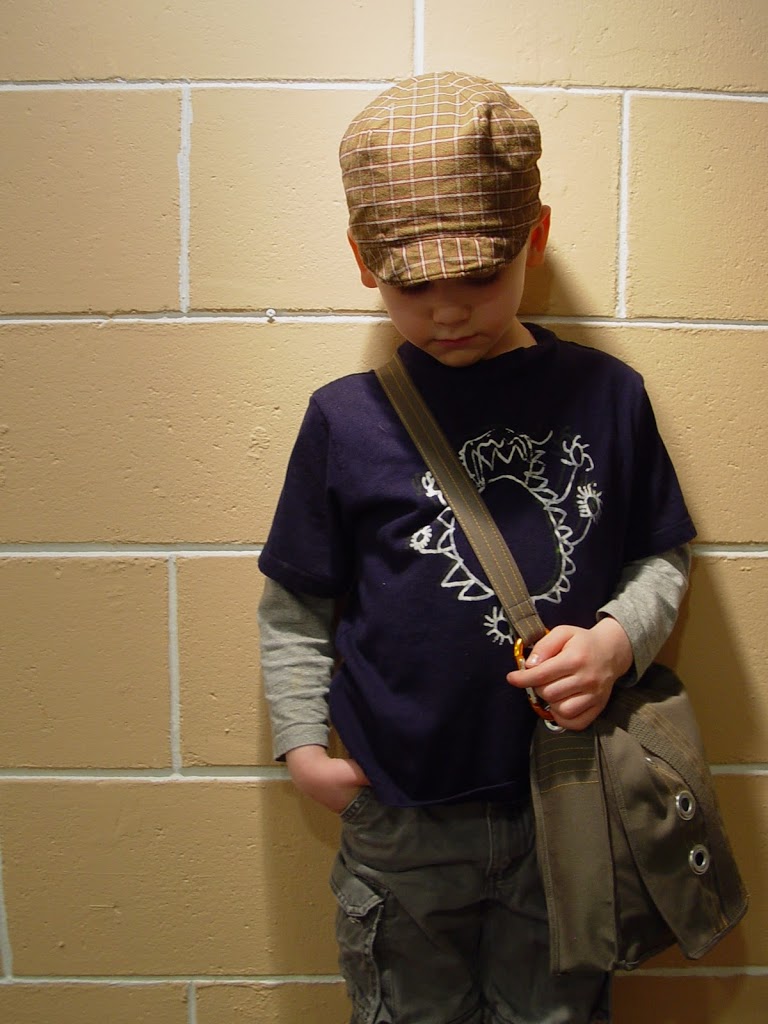
My son is my inspiration for this bag so I’ve named it after him – Connor’s Messenger Bag. He loves camping and he needed a great little bag to take on hikes or walks with easy access to his notepad and pencil, compass, camera and binoculars.

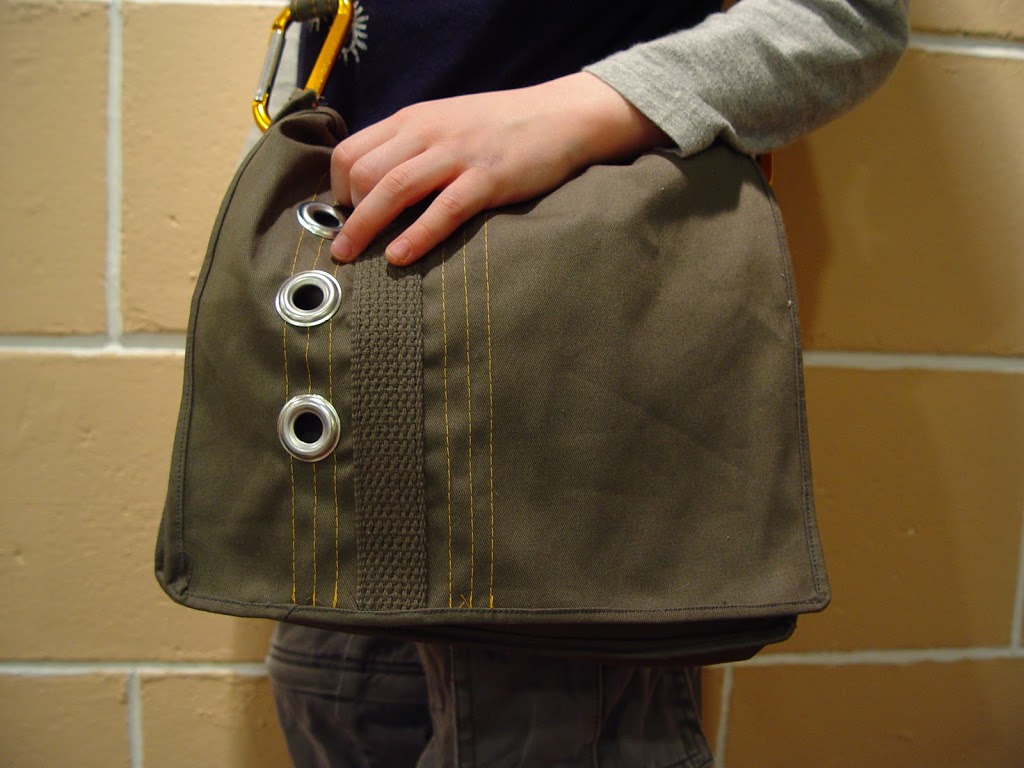
This messenger bag is a simple bag made from heavy twill or denim or even canvas. The hefty weight of the fabric helps give the bag it’s shape. It is unlined for a quick simple project.
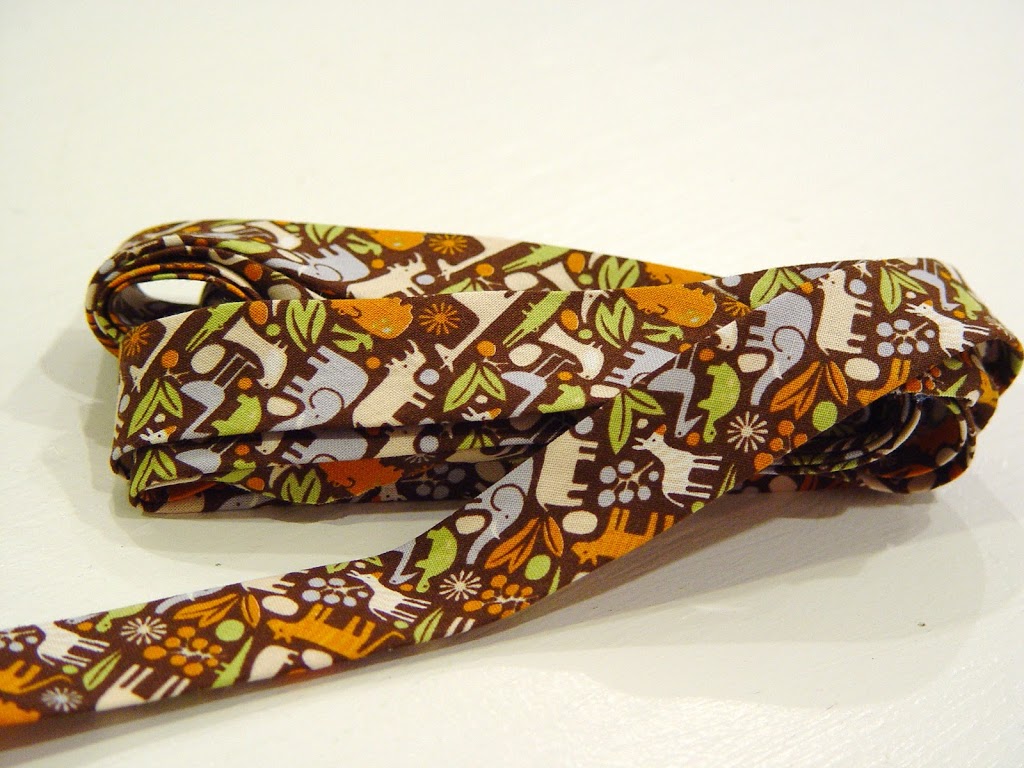
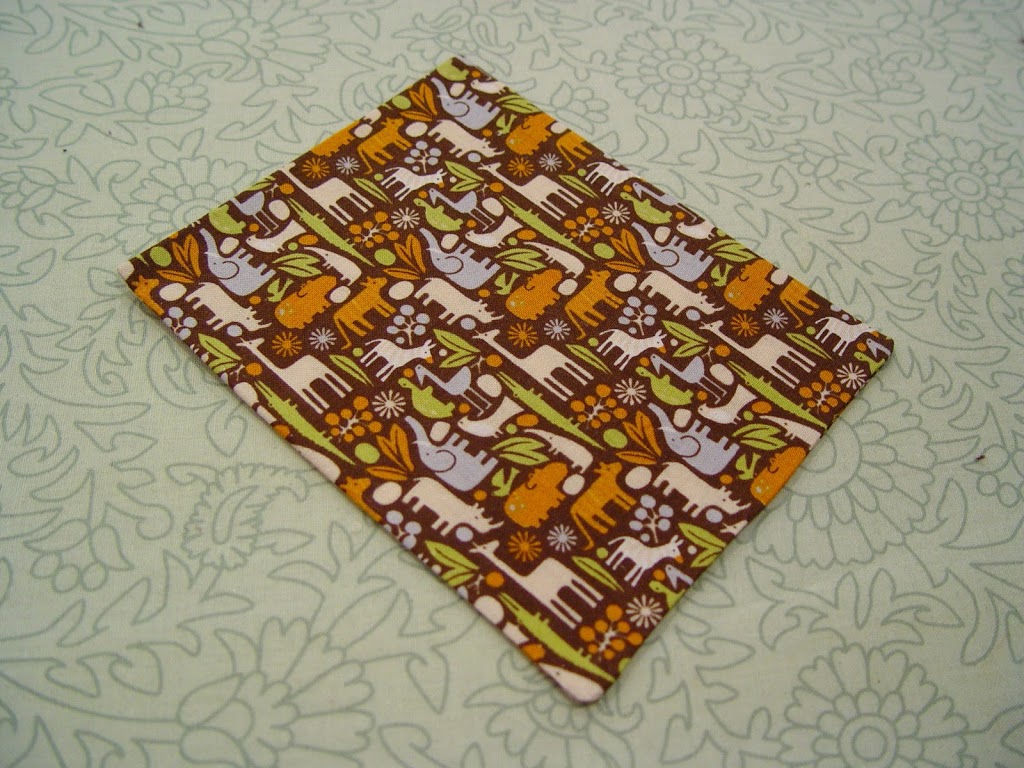
The other version is made with brown denim. For this version I used a Alexander Henry’s mini 2-D Zoo in Chocolate for the bias tape and also replaced it for the cotton webbing.
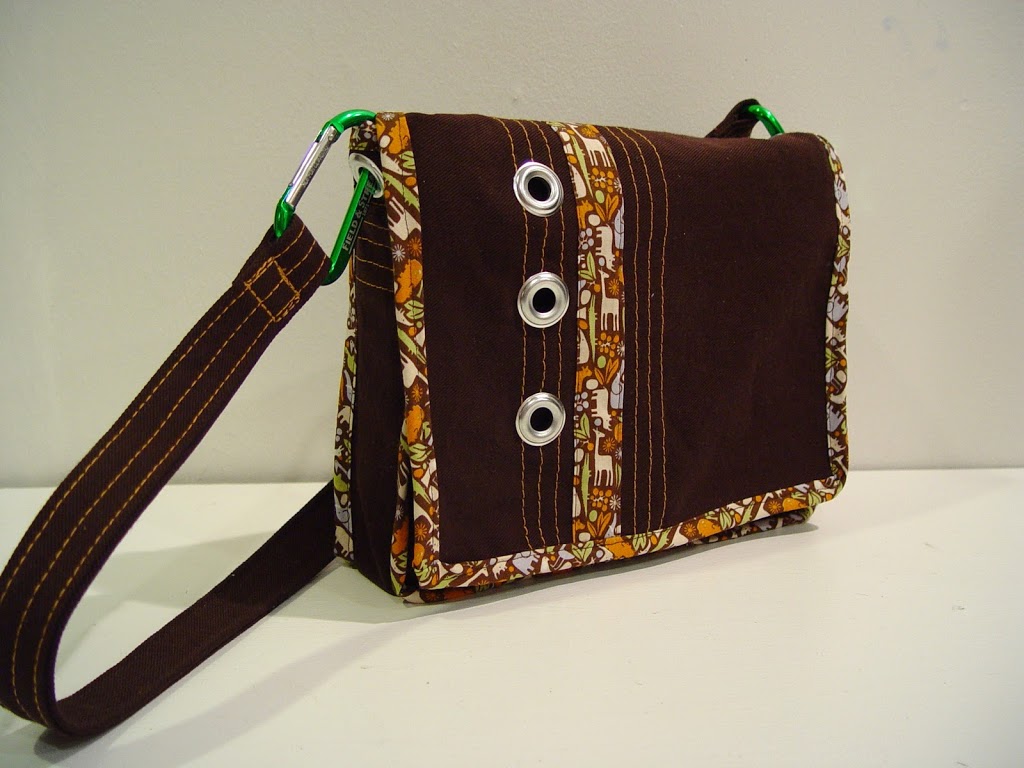
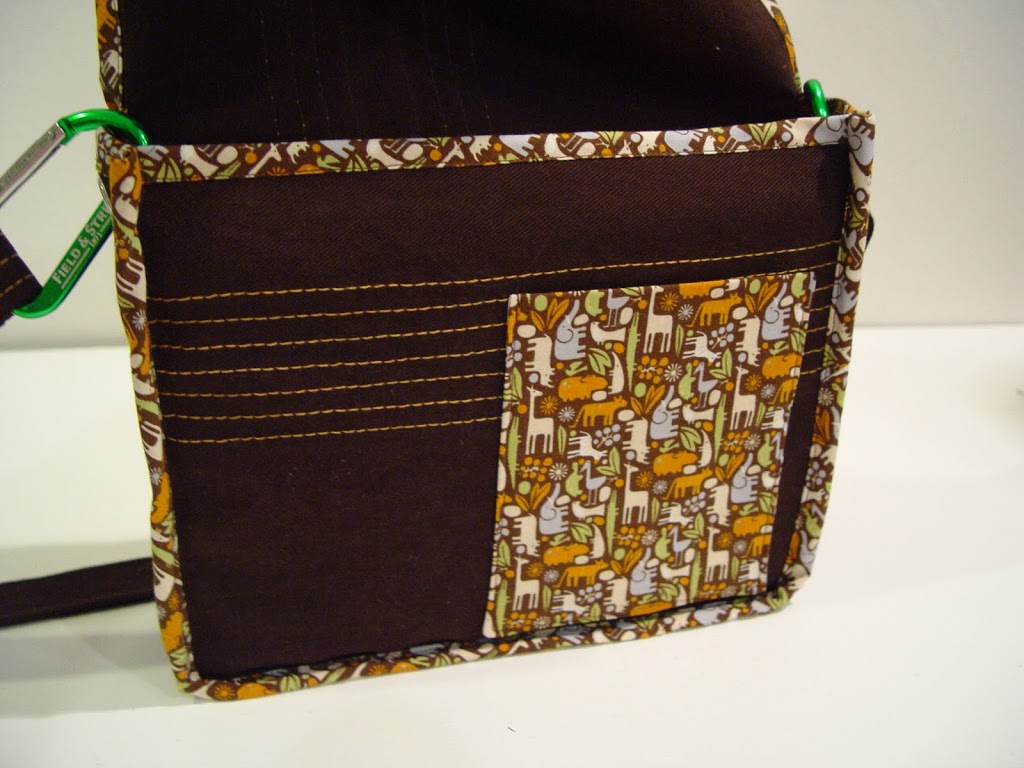
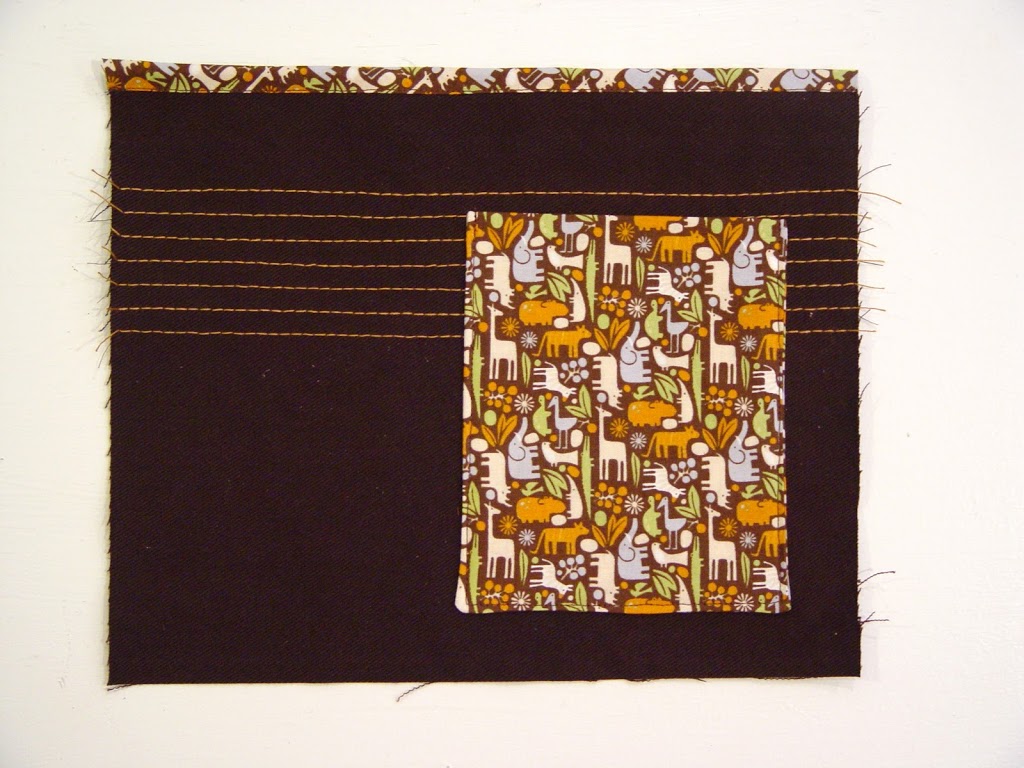
I also added a simple pocket and more thread details on the inside. (optional)
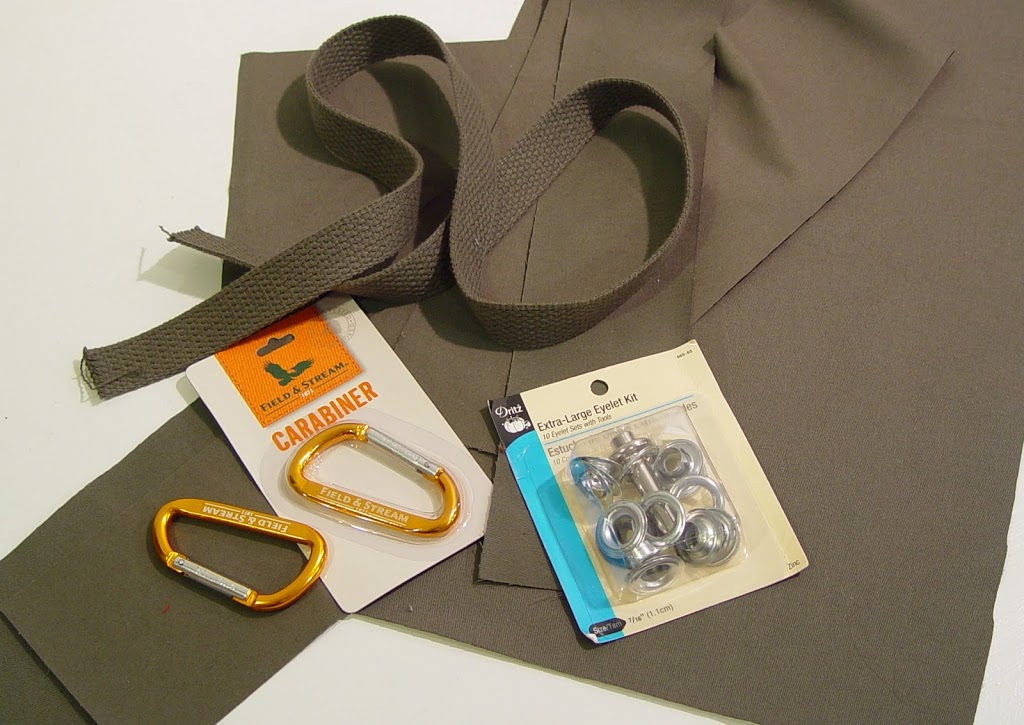
For this project you’ll need:
Fabric pieces:
9″ x 11″ front piece
11″ x 18″ back and flap piece
3″ x 27″ side piece
4″ x 36″ strap piece (For and older boy, I’d recommend 4″ x 44″)
5″ x 11.5″ pocket (optional)
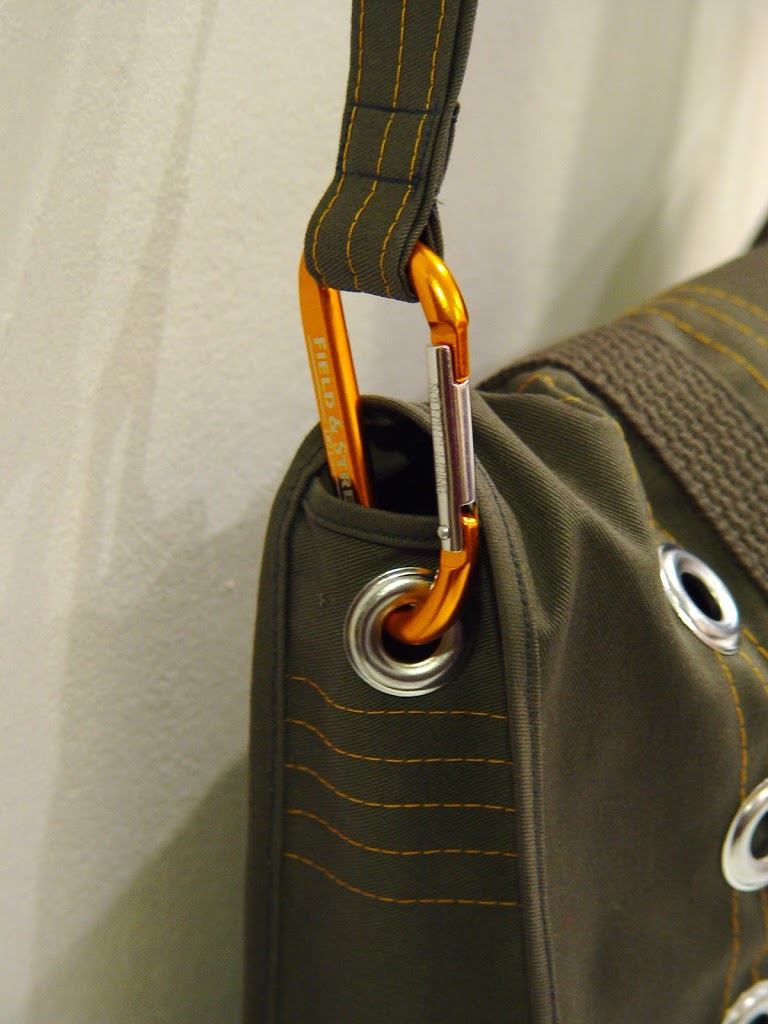
2 carabiner clips (which you can find at any sporting good store for about $1)
a 20″ piece of 1″ wide cotton webbing (the kind for belts) OR a piece of fabric 1.5″ x 19″
seam binding (see here for a great tutorial on making seam binding), you’ll need approximately 100″
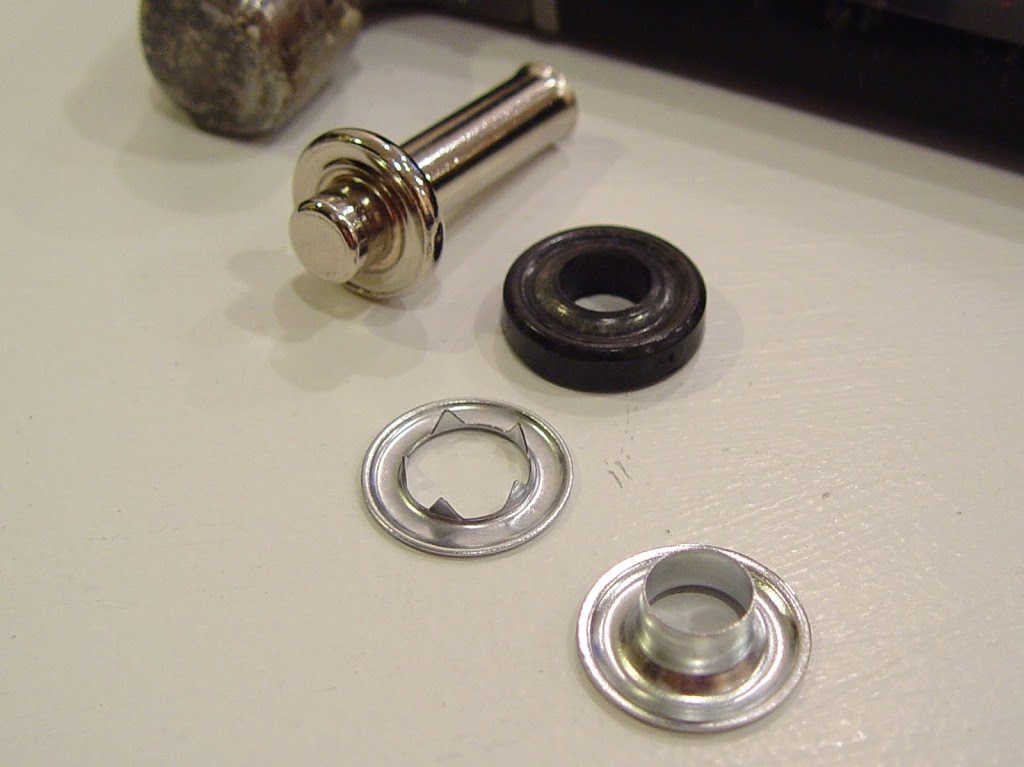
7/16″ grommet kit (you’ll need 5 grommets)
thread (in the color of your bag’s fabric and a contrasting color for the decoration)
heavy duty sewing machine needle
hammer
Ok. Let’s get started. There are a lot of pictures here, but trust me the bag is super simple. The pictures do vary between the green and brown versions, but everything is the same.
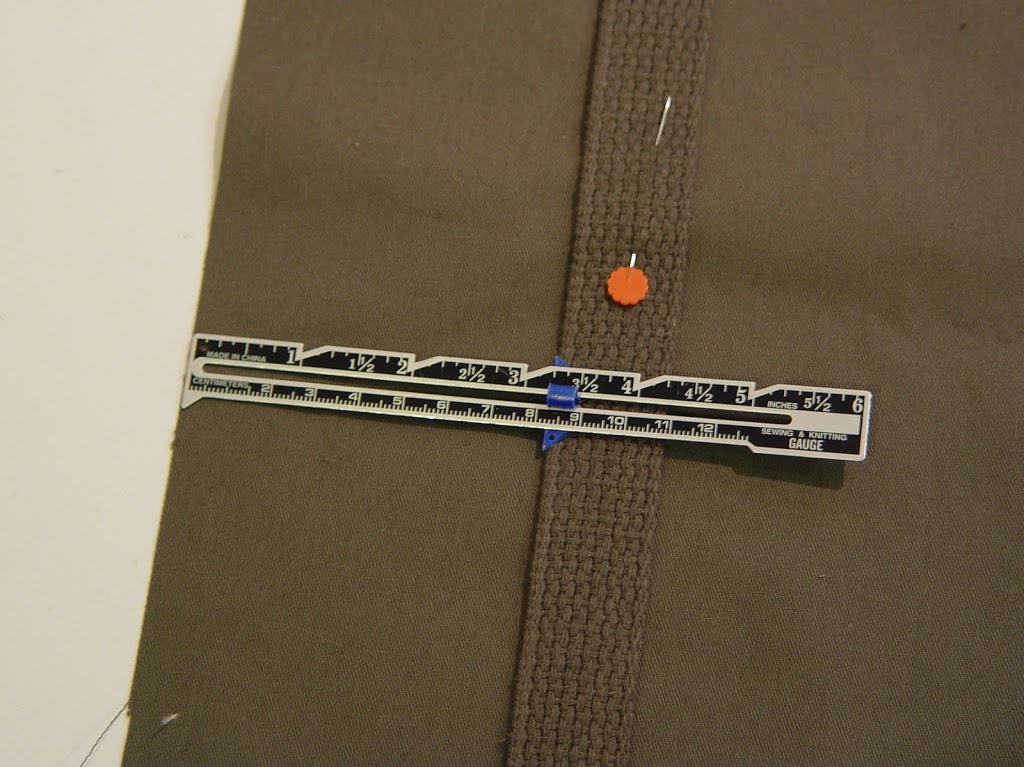
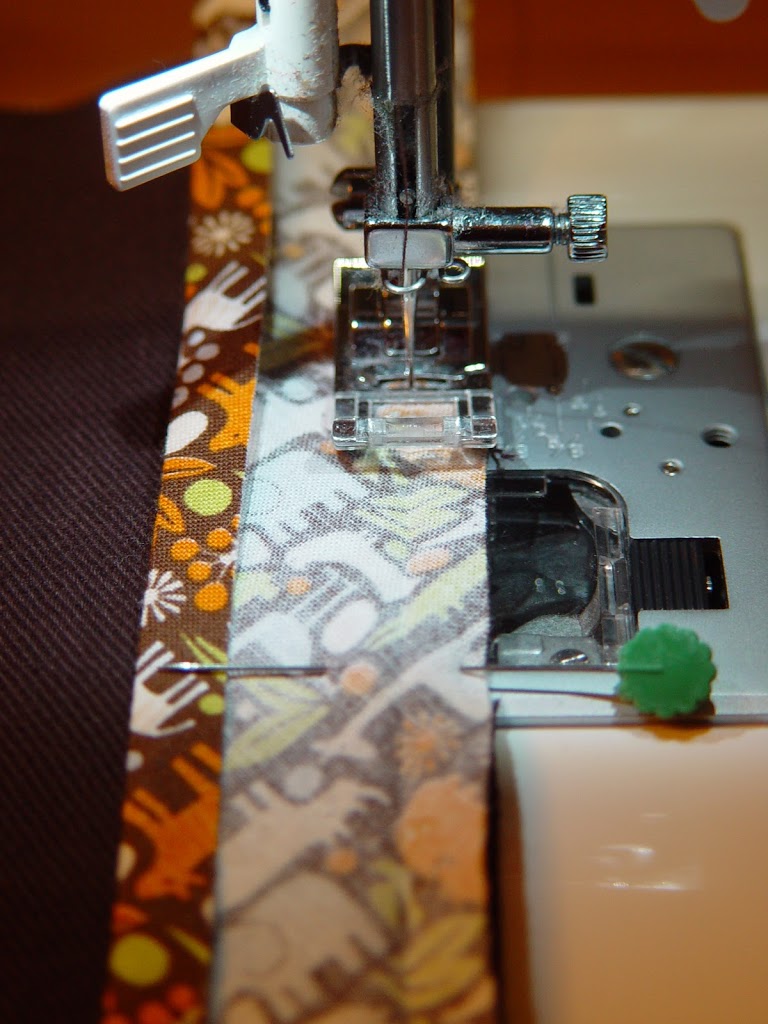
First we’ll add some of the details to the bag. Grab the back and flap piece. Sew on the cotton webbing about 3.25″ from the edge. Sew in place.
If you’re using fabric instead of the webbing, take your 1.5″ x 19″ piece and fold each side under 1/4″ to make it 1″ x 19″. Attach as you would above. Set this piece aside.
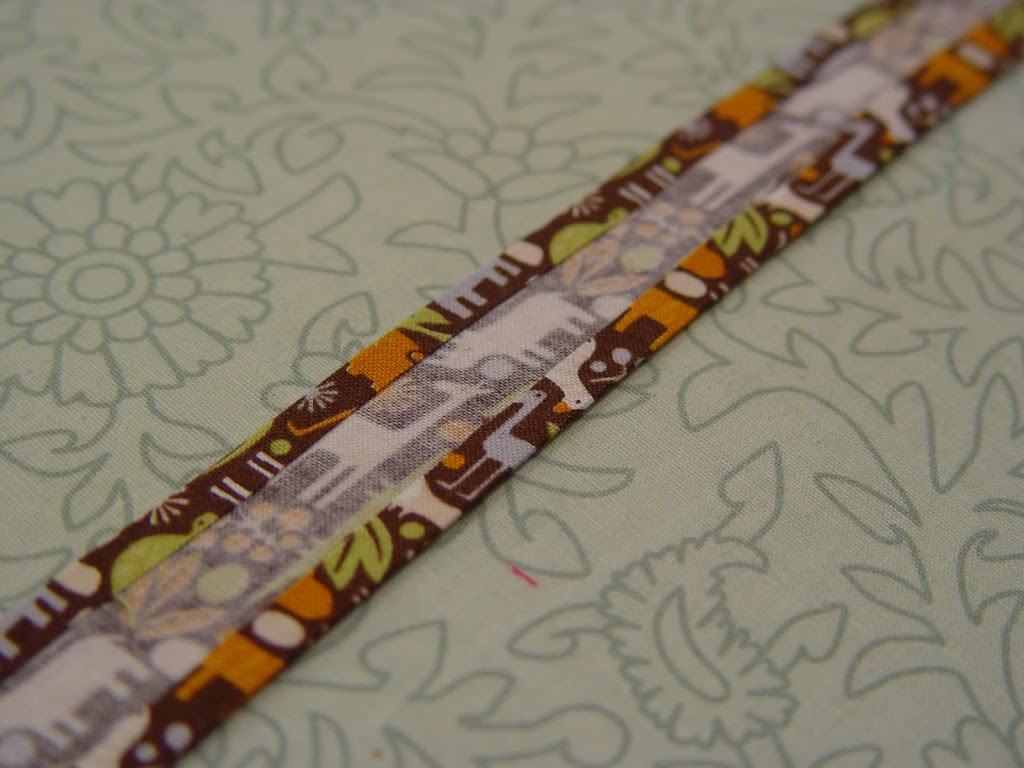
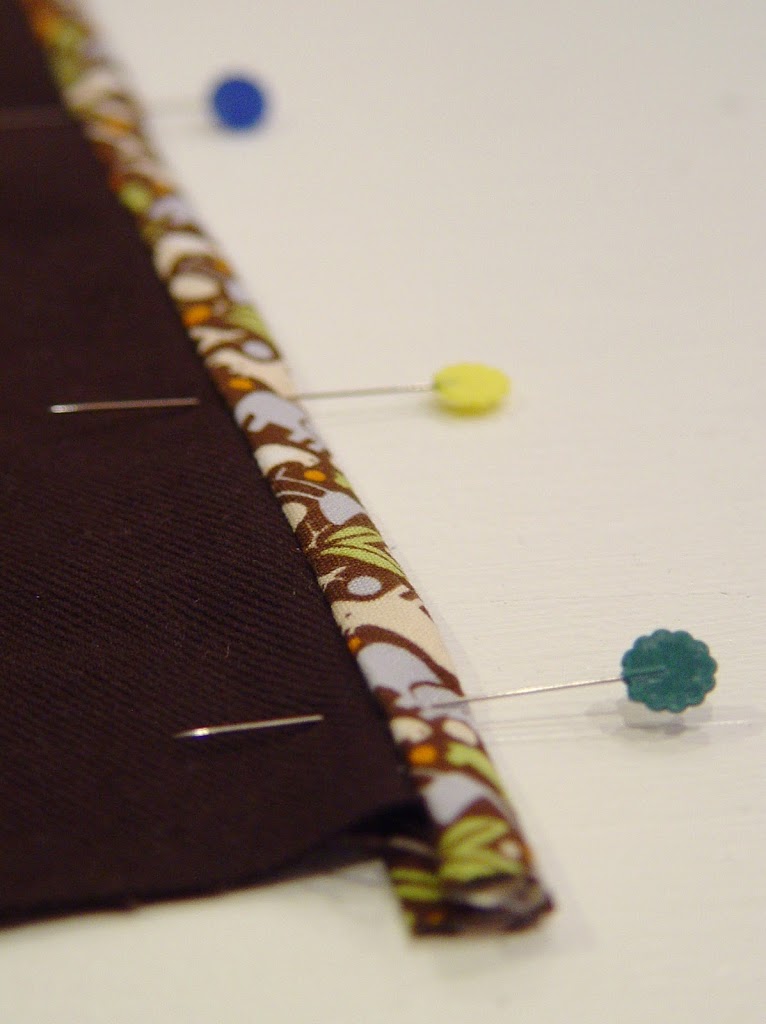
Now we’re going to add the bias tape to the side piece (3″ x 27″) and front piece (9″ x 11″). Grab your seam binding. (I just love how this looks!) If you don’t know how to make your own seam binding, there’s a great tutorial here.
There are two basic ways you can add seam binding. The first is the quick and dirty method. Let’s start with the side piece. Pin the seam binding around the short end of the side piece.
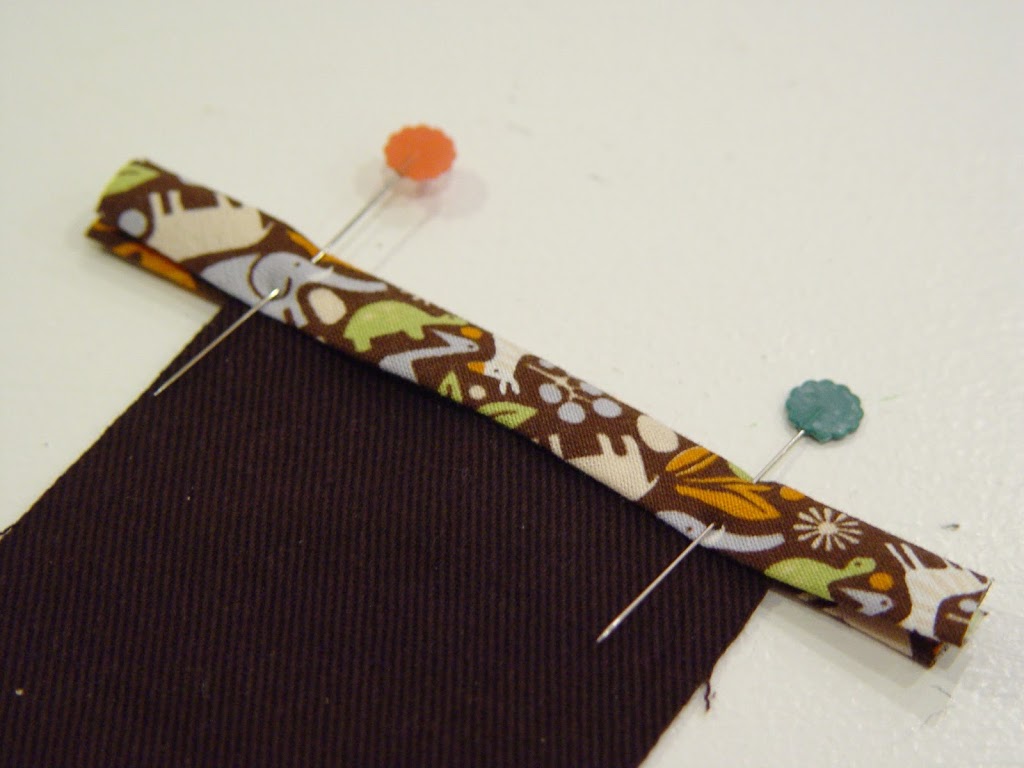
Simply sew in place. This method works well here since we have a small piece and there are no curves.
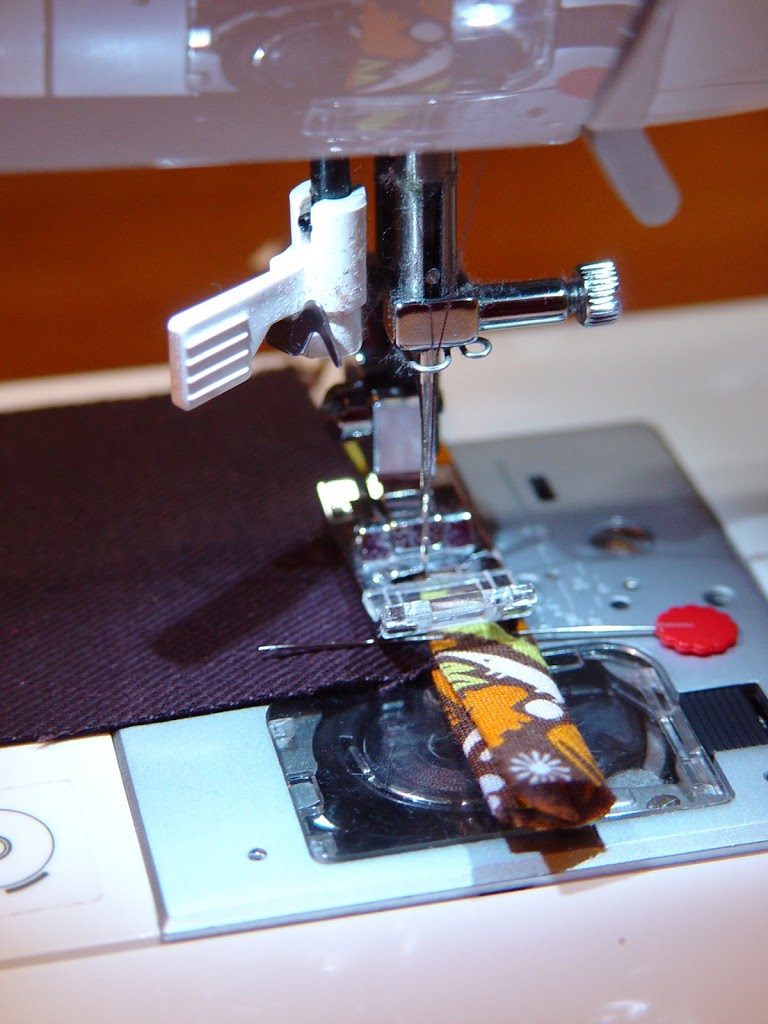
Trim any excess seam binding. And repeat for the other end of the side piece and then set it aside.
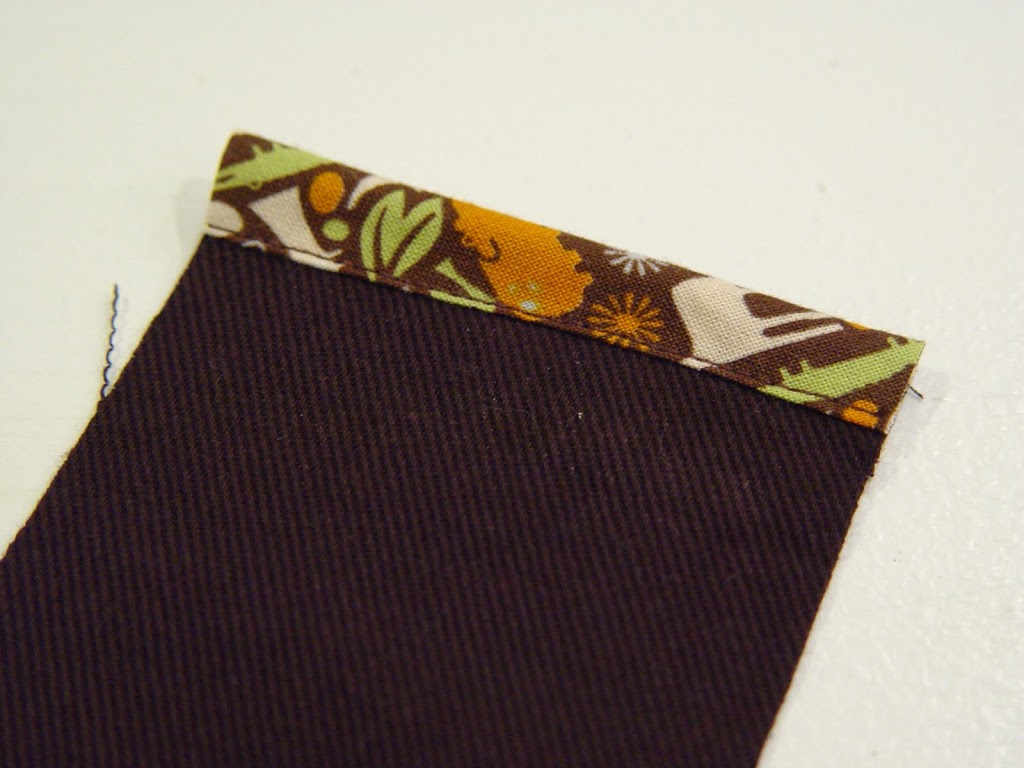
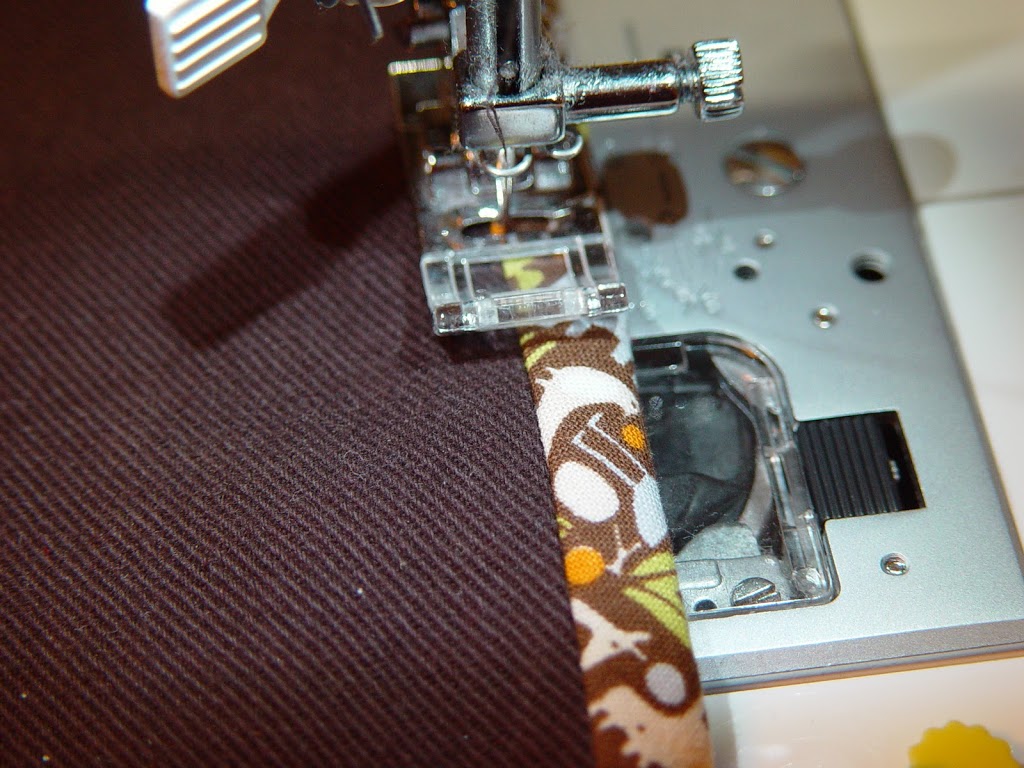
Grab the front panel (9″ x 11″). We’ll add the seam binding to this piece now. This method for adding the binding is a little neater and I recommend using it when you add it to the assembled bag. Start by opening the seam binding and pinning the raw edges together.
Sew in the fold.
Next fold over the bias tape and pin in place.
Sew along the top, catching the seam binding underneath. Set this piece aside.
Now let’s add some of the decorative stitching.
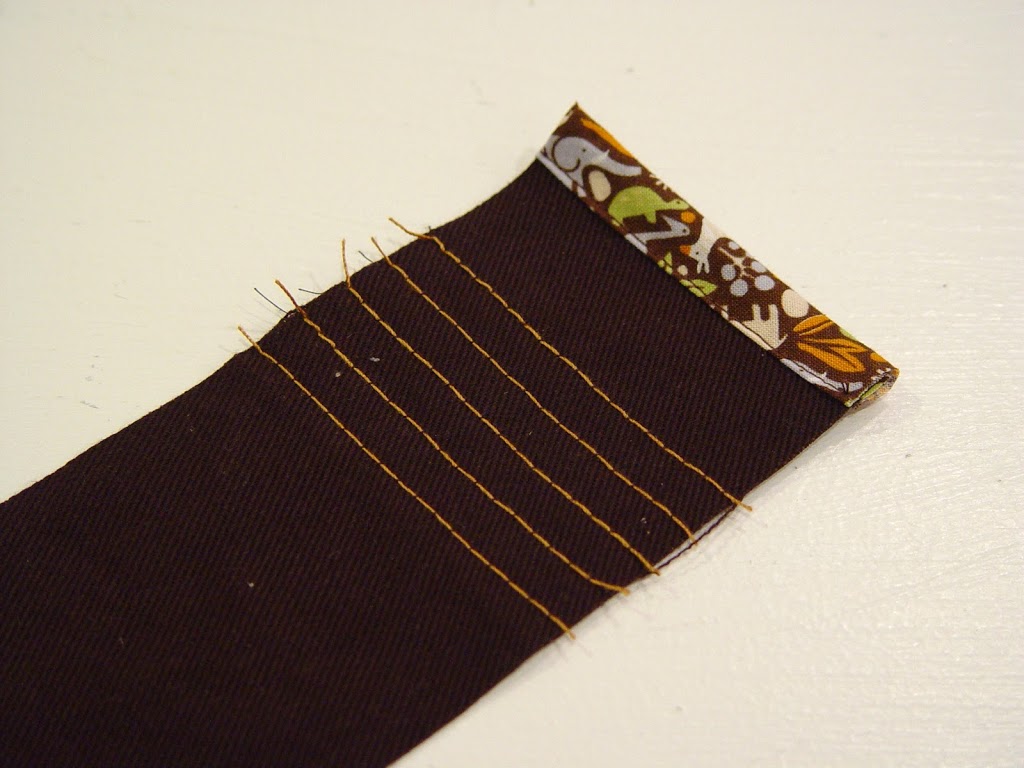
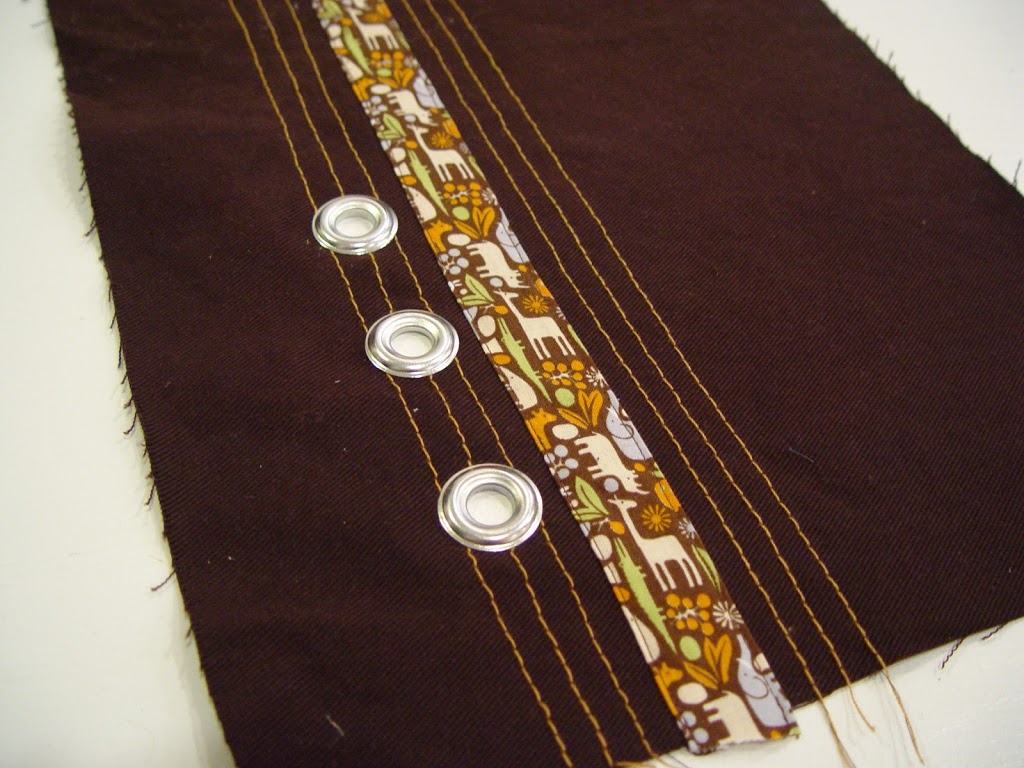
Increase the length of your stitch to approximately 6 stitches per inch (this is the longest stitch length on my machine). Using your contrasting thread, sew three parallel lines on both sides of the cotton webbing (or fabric strip) each 3/8″ apart.
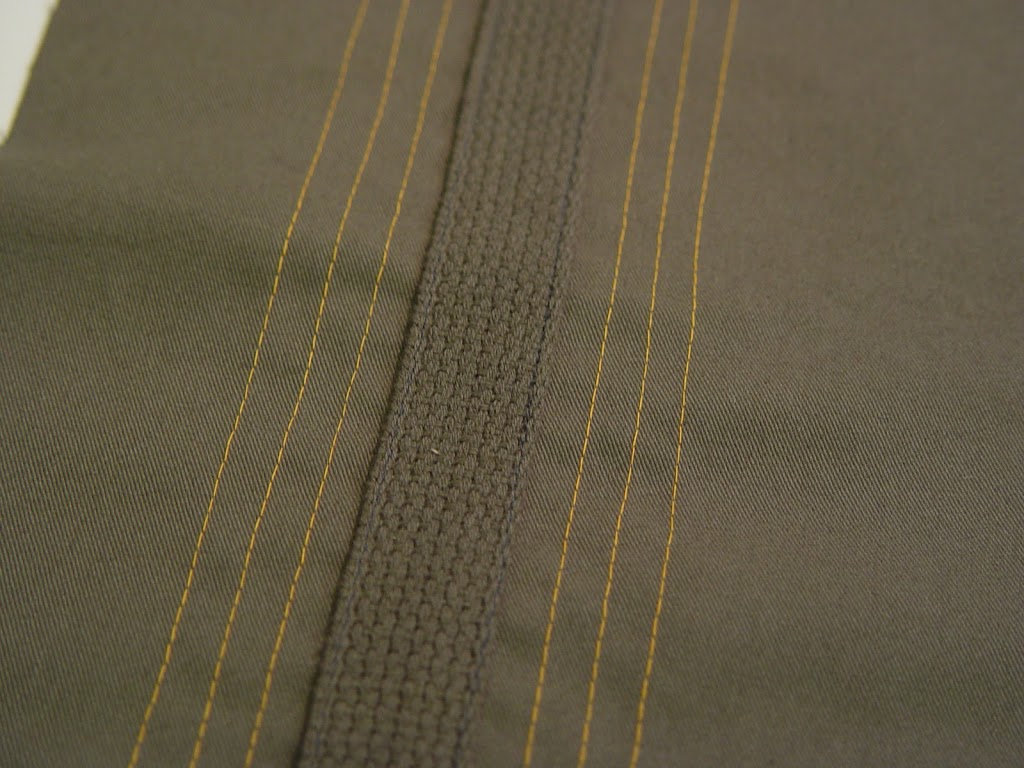
For the side piece, sew a line 1.5″ from the top and then sew 4 more lines (for a total of 5), each 3/8″ apart. Repeat for the other end of the side piece.
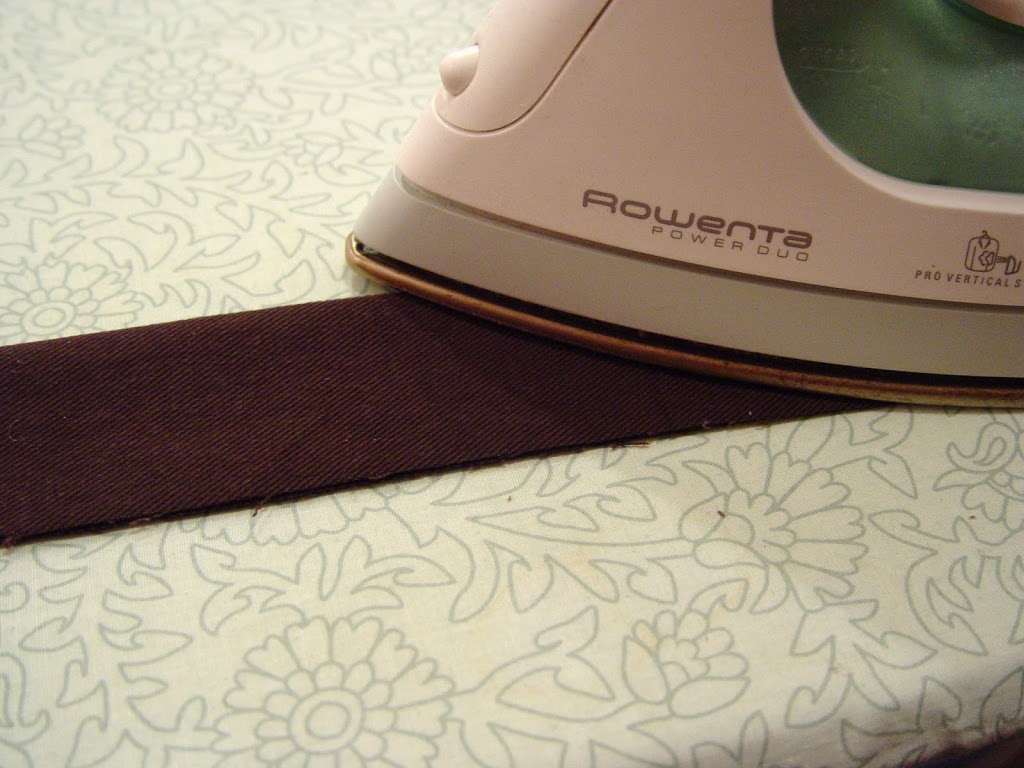
To make the strap: Grab the strap piece (4″ x 36″). Place it right side down and iron flat.

Fold over lengthwise and iron.
Open it back up.
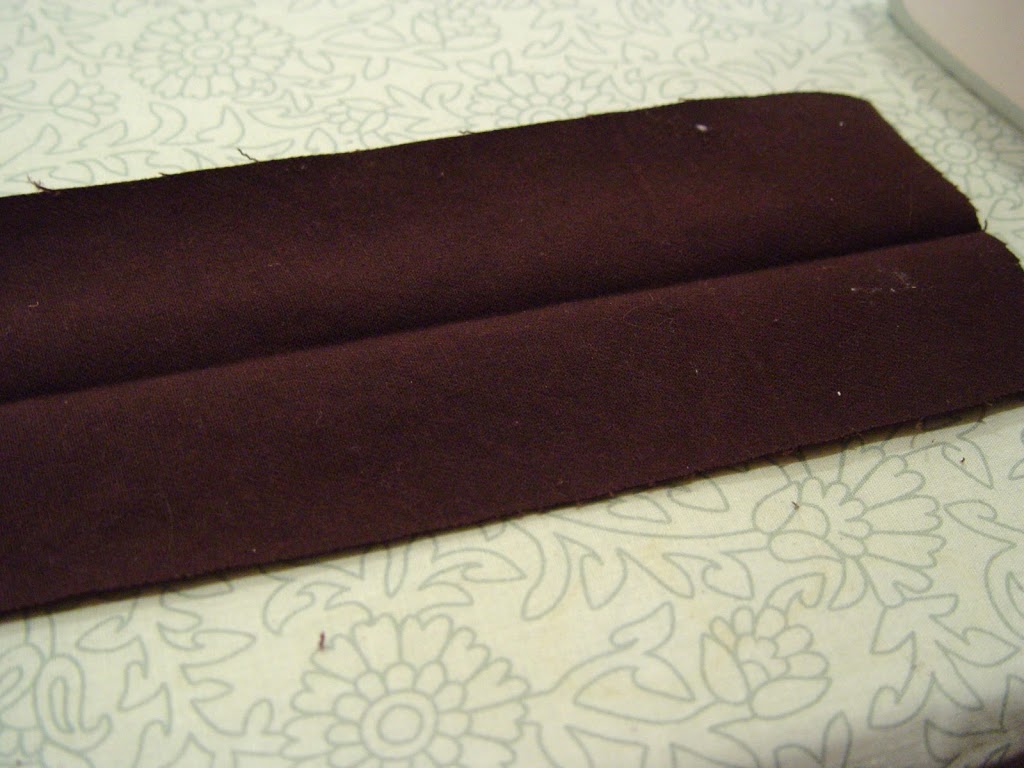
Fold the raw edges into the center fold and iron again.
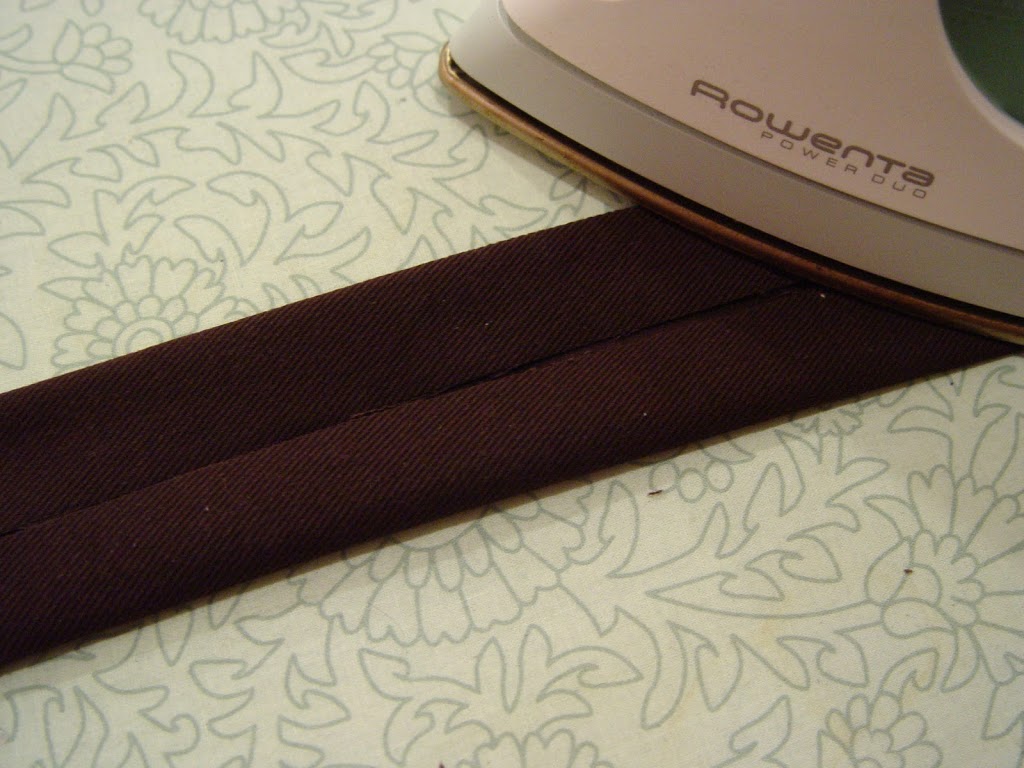
Fold in half along the center seam and press again.

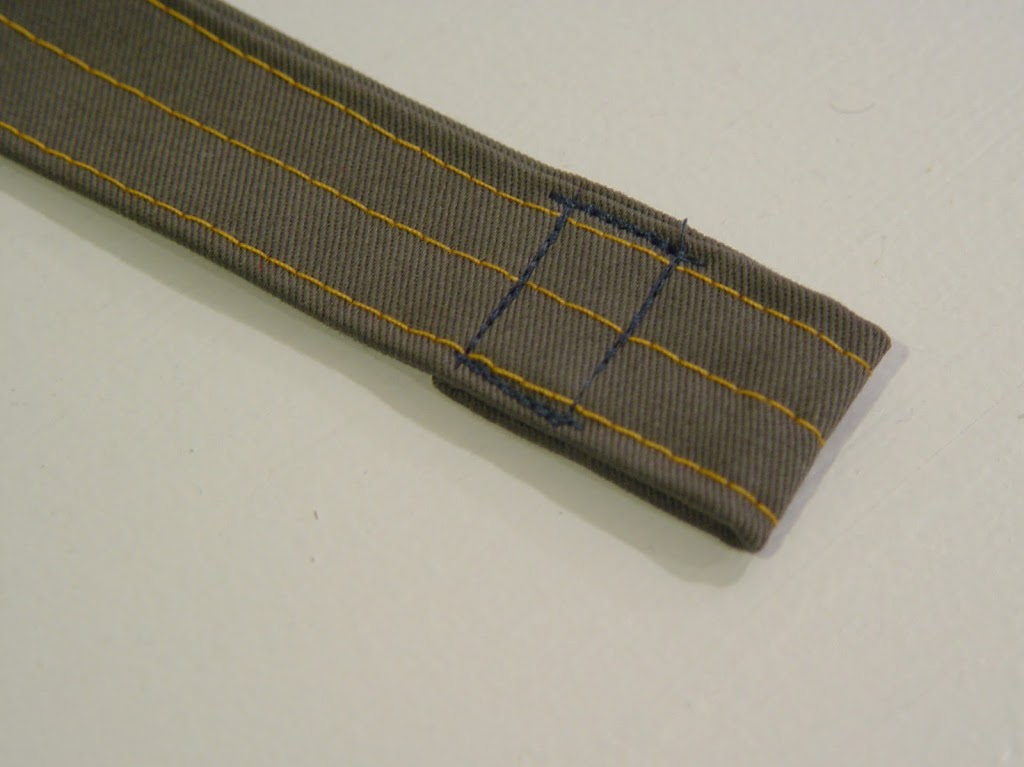
Stitch 1/4″ in from the end (on both ends) and down the center.

Fold over the end, approximately 2.5″ from the end. Fold 1″ of the strap under again.
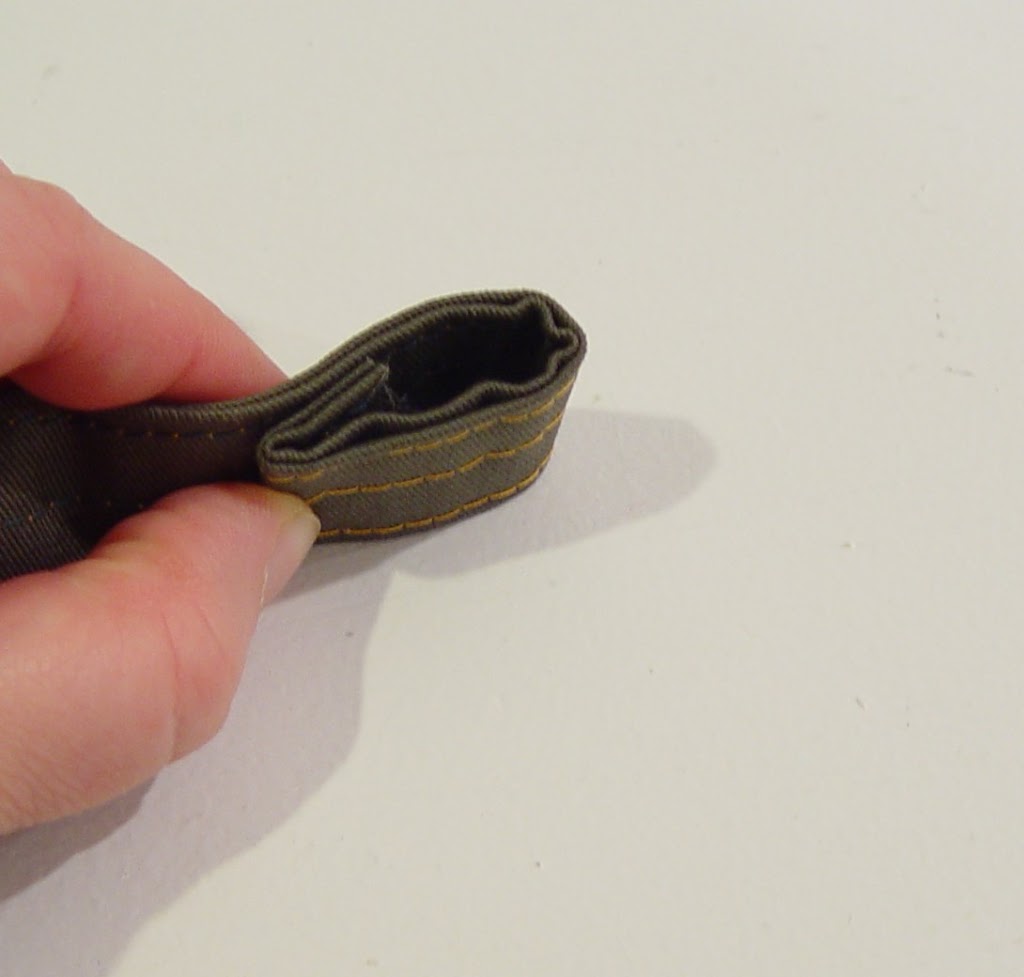
Sew in place.
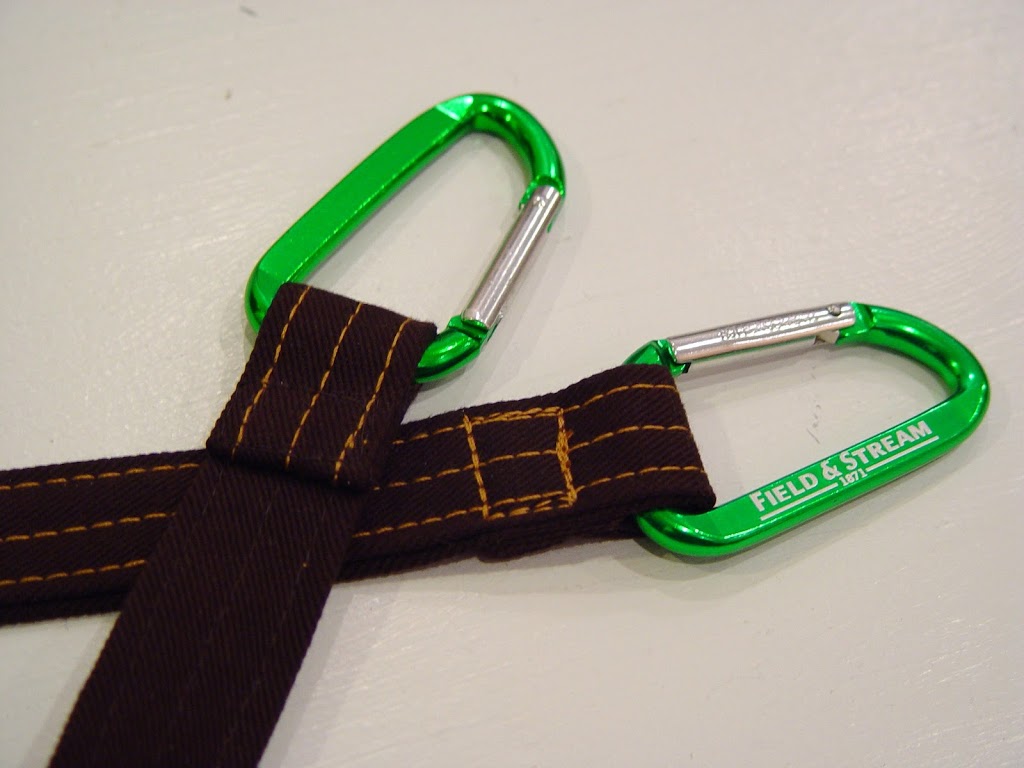
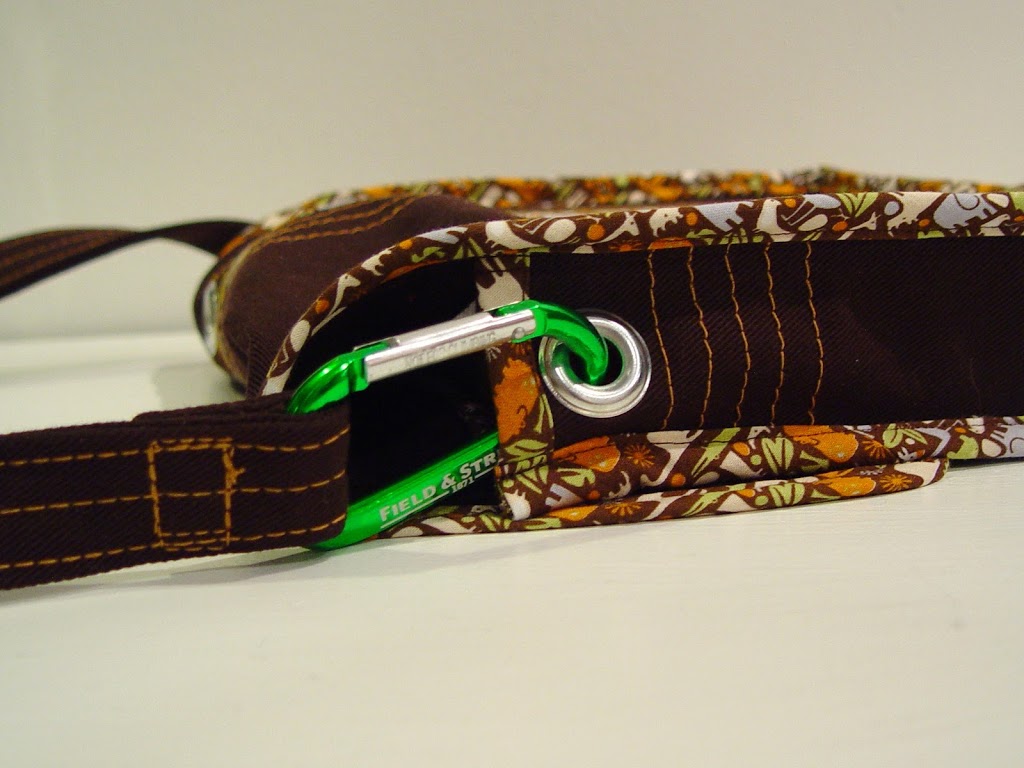
Grab your carabener clips and attach them to the ends.
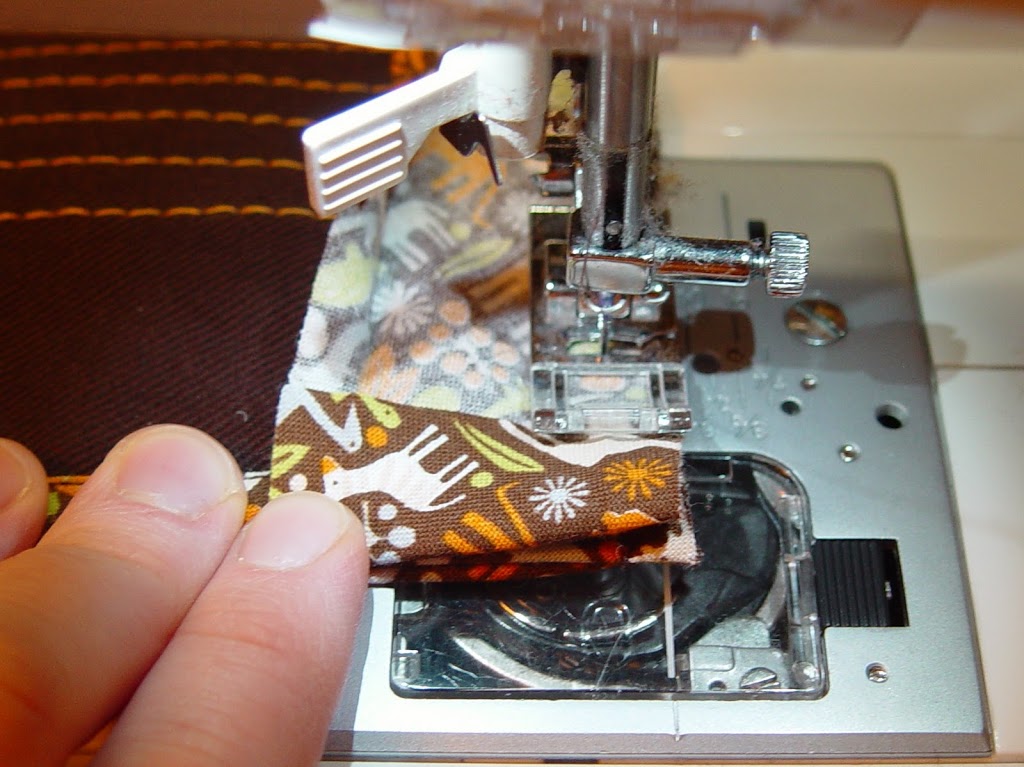
To make the optional pocket: Grab the pocket piece and fold in half, right sides together. Sew around the edge with a 1/4″ seam allowance leaving an opening at the bottom for turning. Trim the corners.
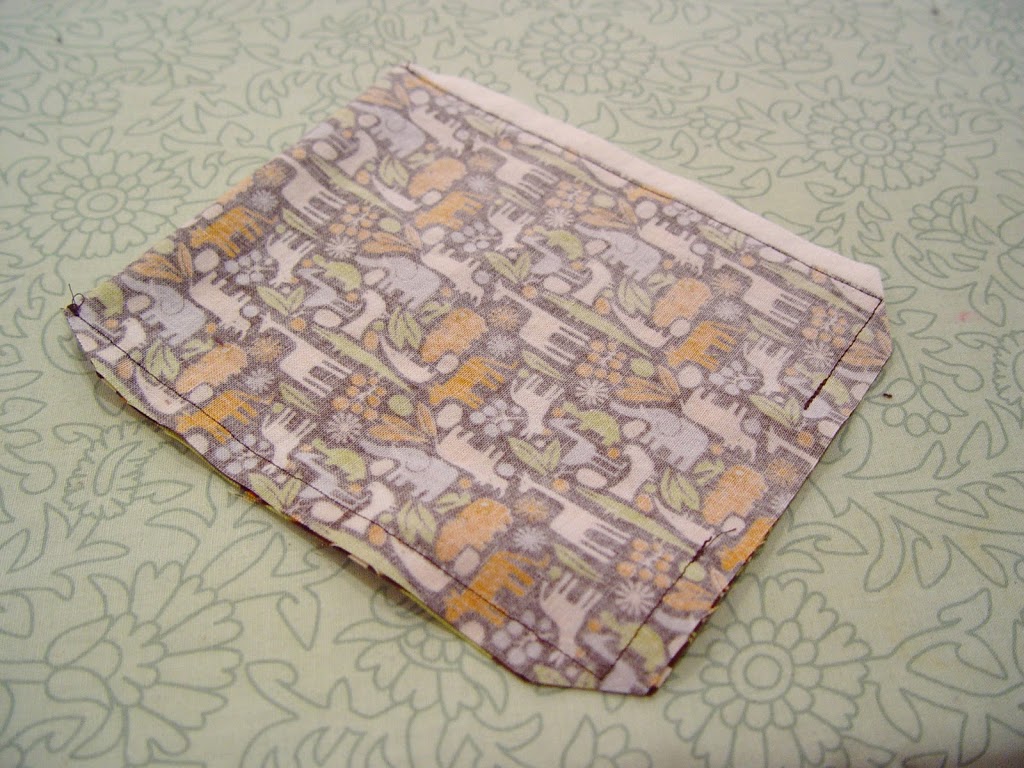
Turn the pocket right side out and iron.
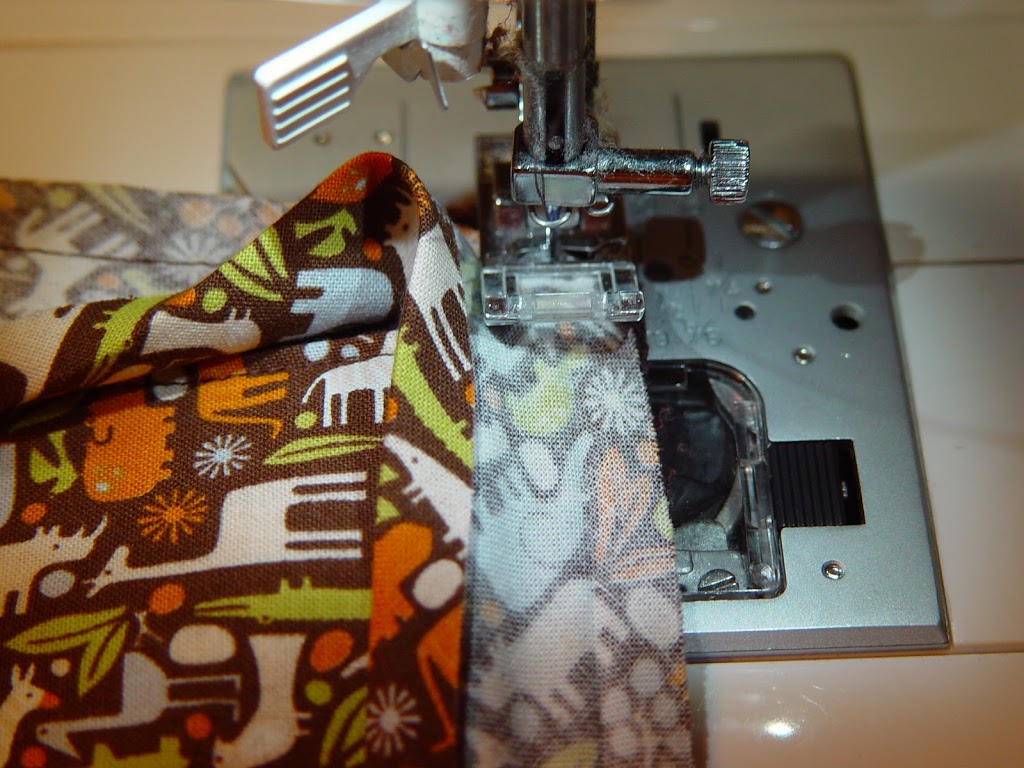
Add it to your front piece along with some decorative stitching if you like.
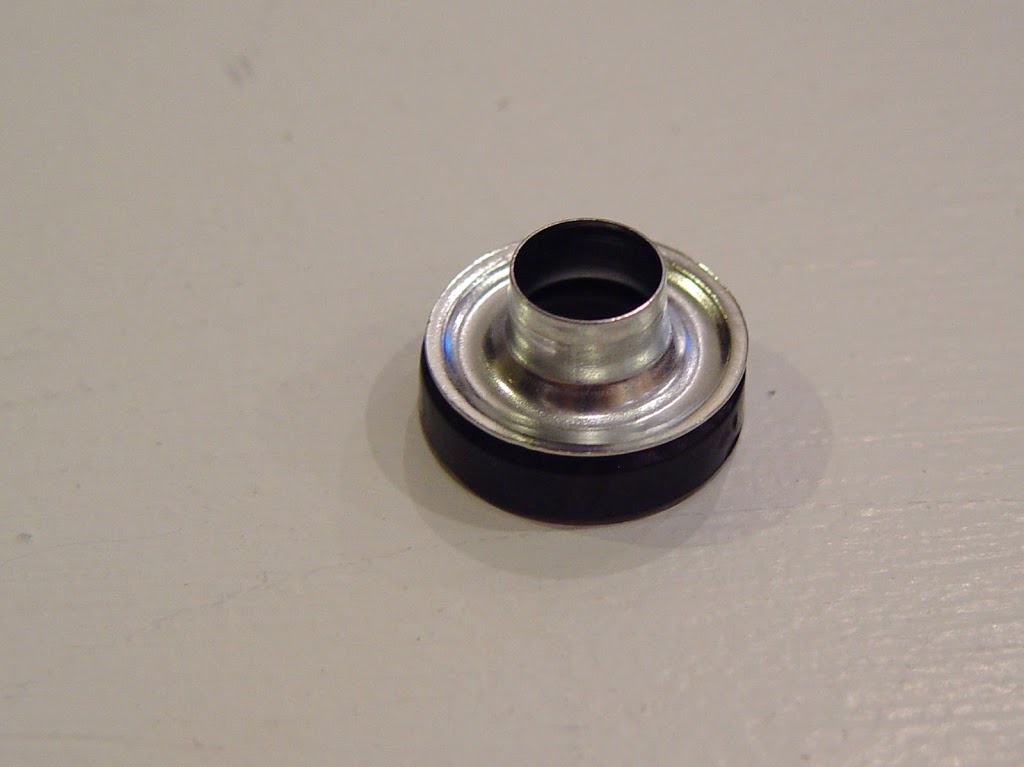
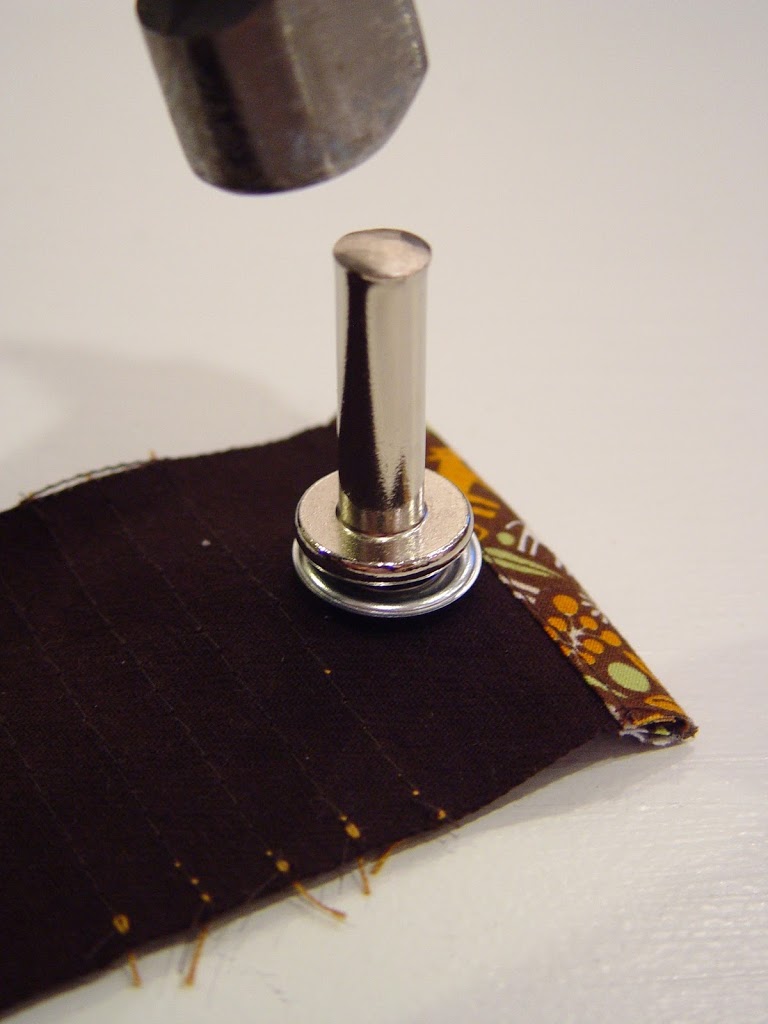
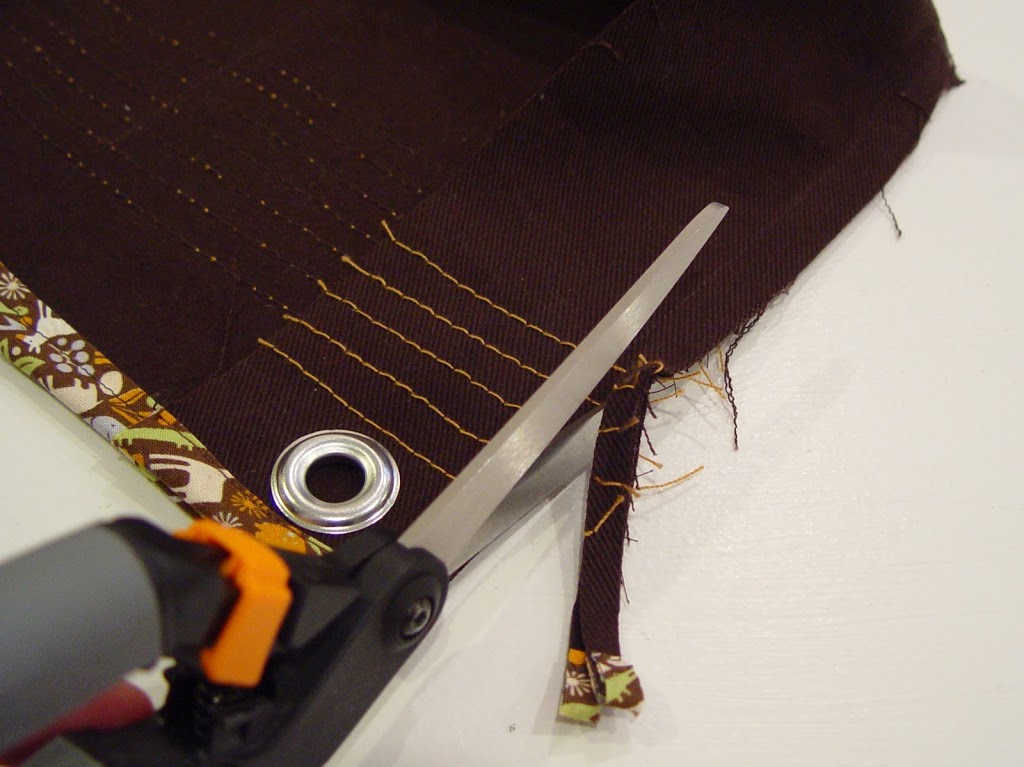
Adding the grommets: Adding grommets is quite simple. Make sure you do this on a concrete floor or outside on your driveway. In your grommet kit you’ll get an anvil, an eyelet, a washer and the setter. Don’t forget to grab your hammer.
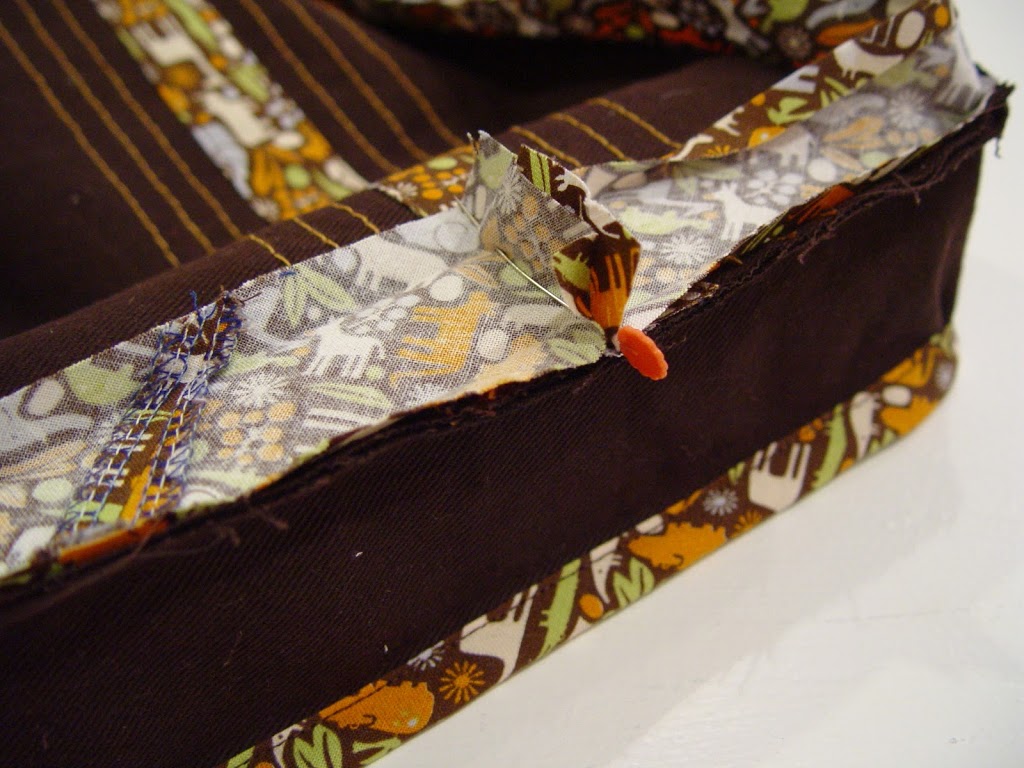
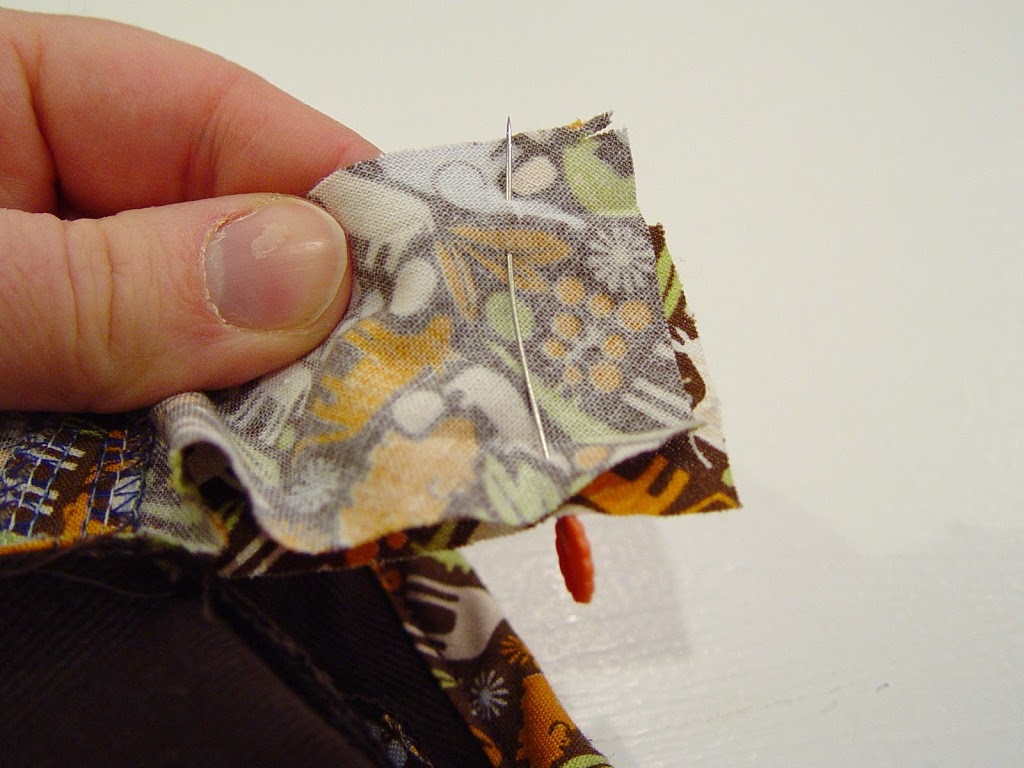
Start by using the eyelet and trace a circle inside it to mark where to cut. Center your mark between the bias tape and the decorative thread.
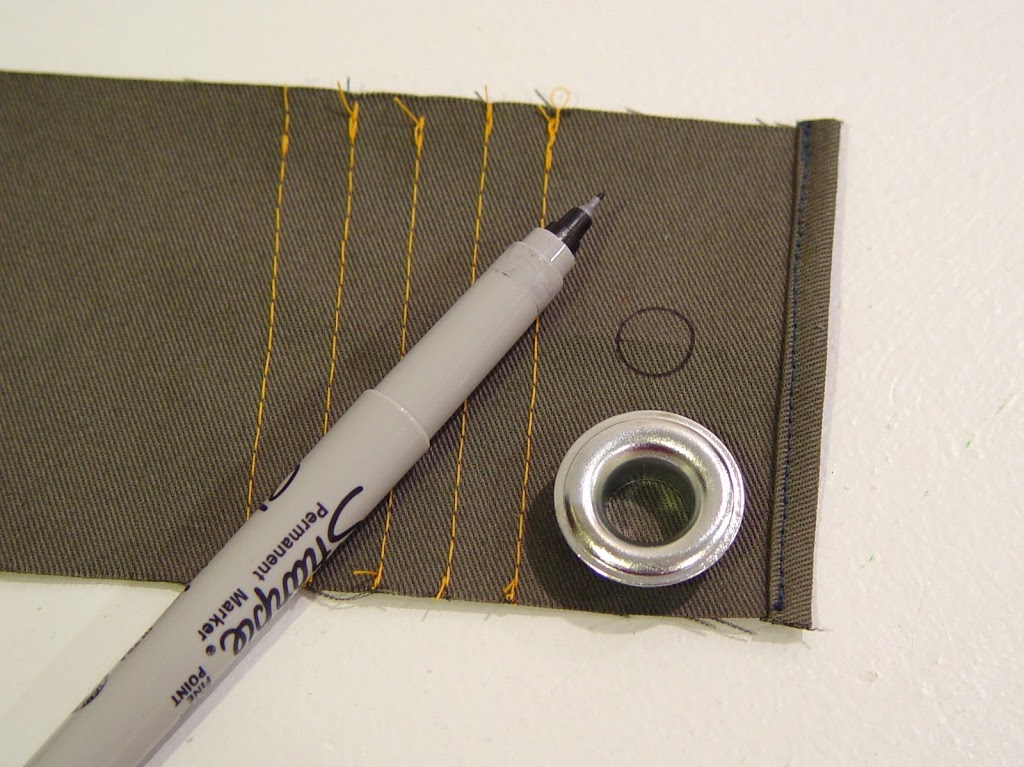
Cut out the marked circle.
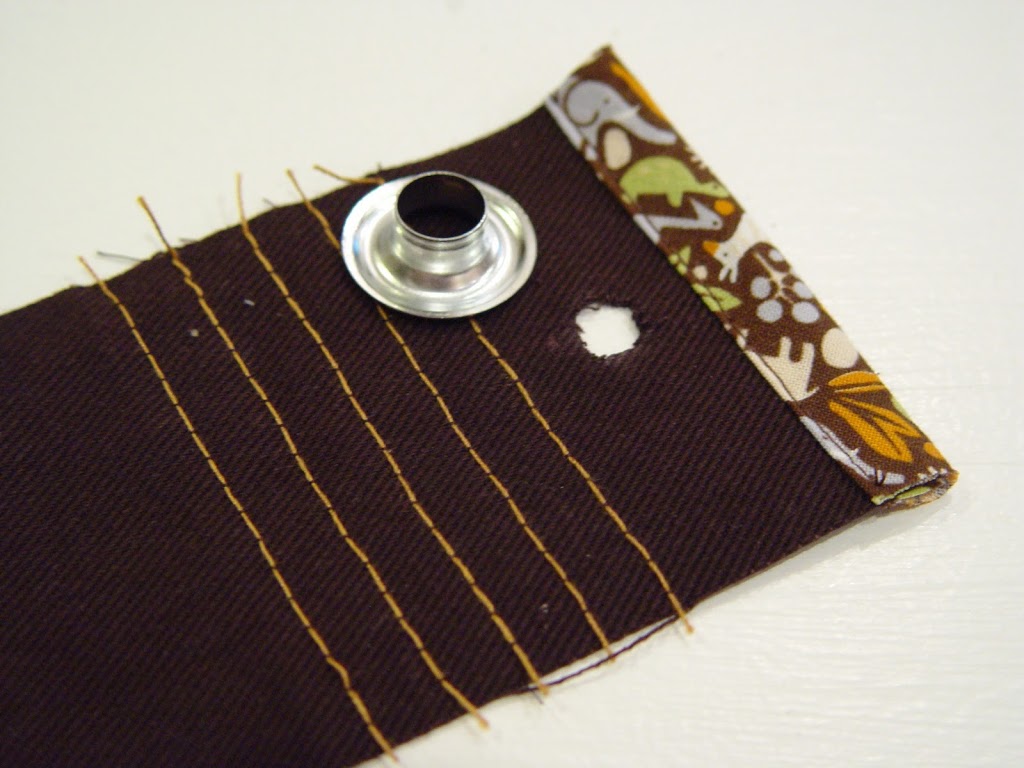
Next place the anvil on your concrete surface with the eyelet on top.
Place your fabric (right side down) on top of the eyelet.
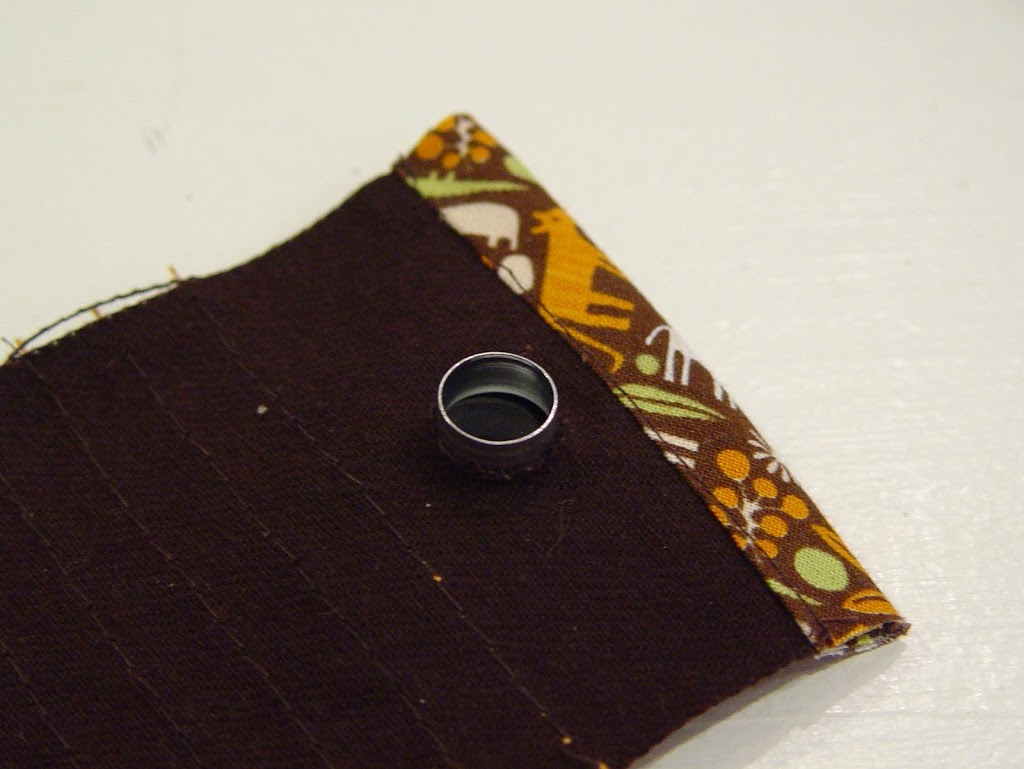
Place the washer on (prong side down).

Place the setter inside the eyelet and hammer to secure the grommet.
Repeat for the other end of the side piece.
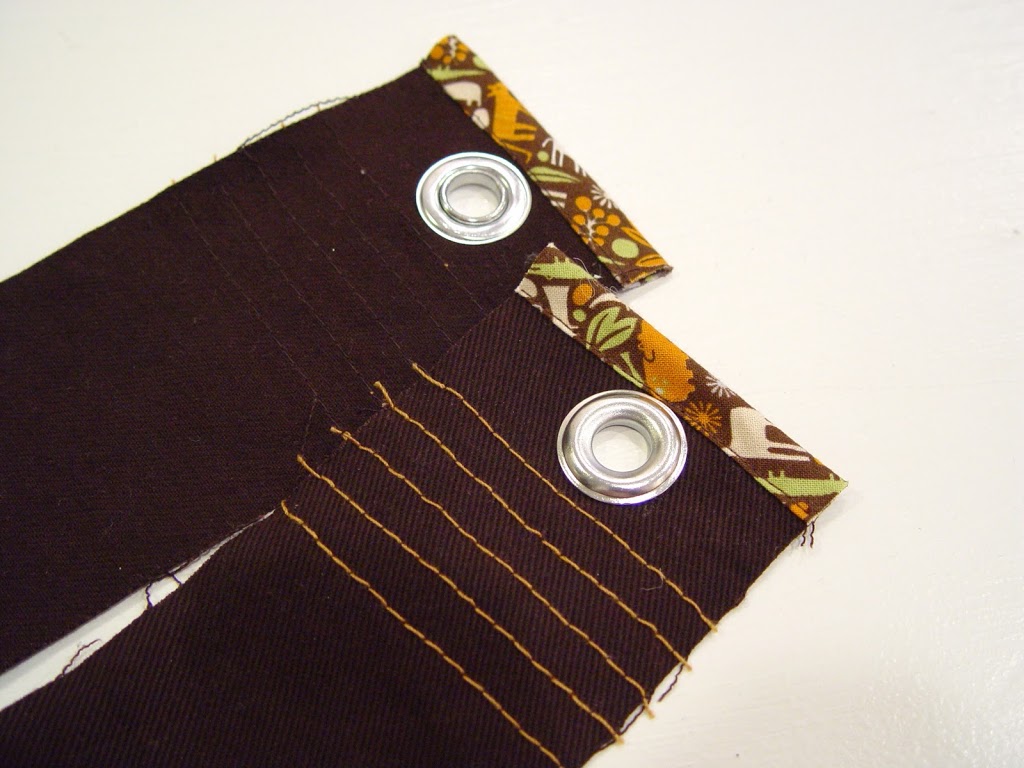
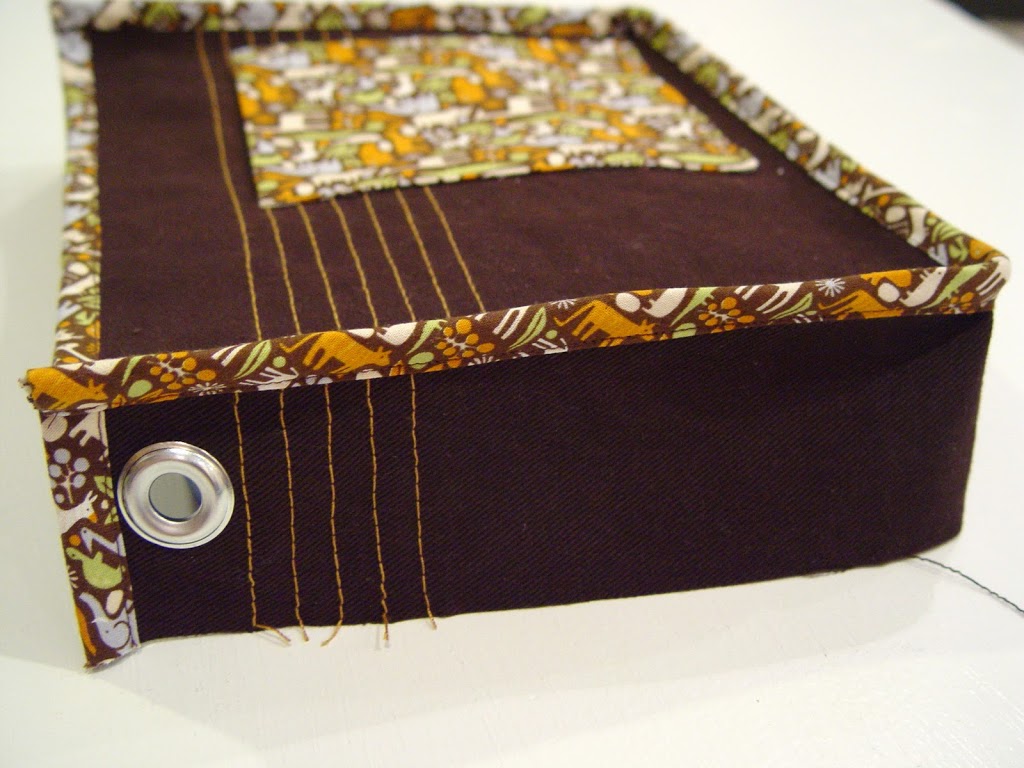
Now add grommets to the back/flap piece. I centered mine in the decorative stitching 3″ from the bottom and then 2″ apart for the other two. This is measuring from center to center of the grommet.
Now let’s assemble the bag.
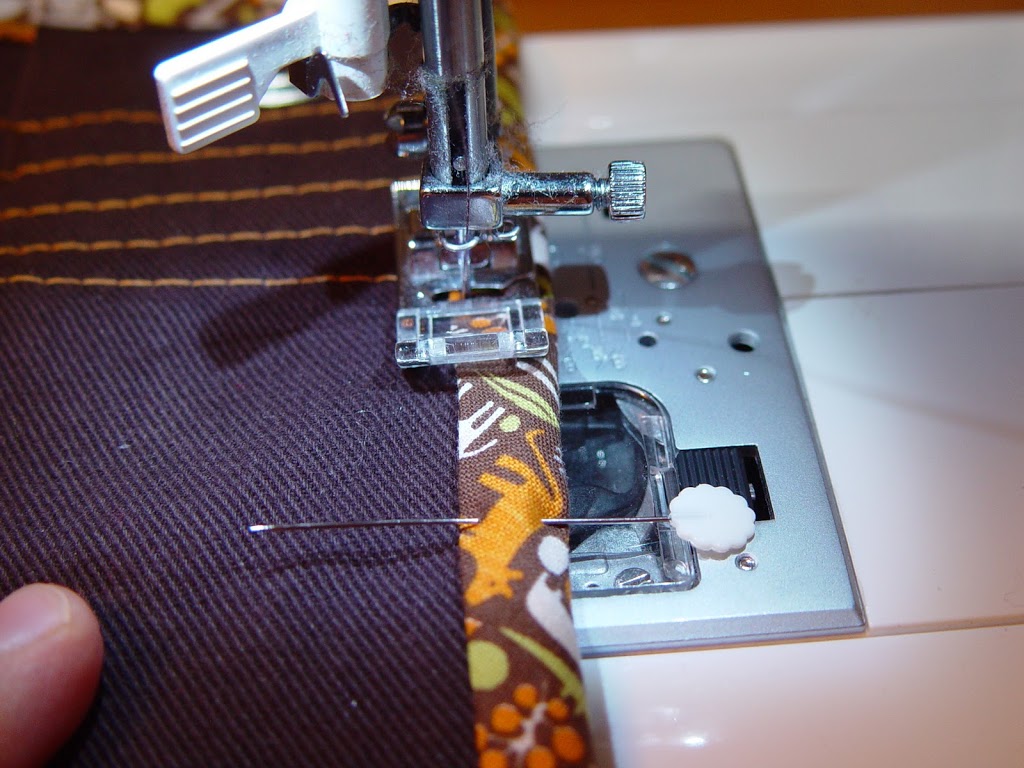
Start by pinning the side piece to the front panel along one edge. You’ll be using a 1/2″ seam allowance here.
When you approach the corner, stop 1/2″ from the end making sure your needle down.
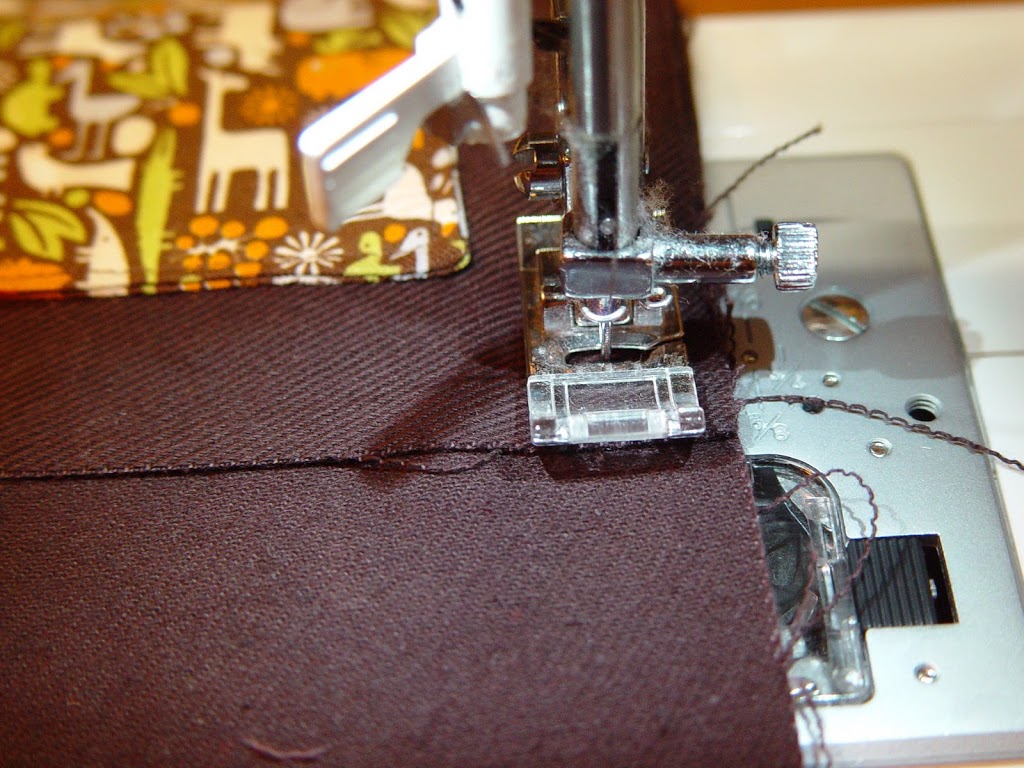
Lift the pressure foot and rotate your fabric.
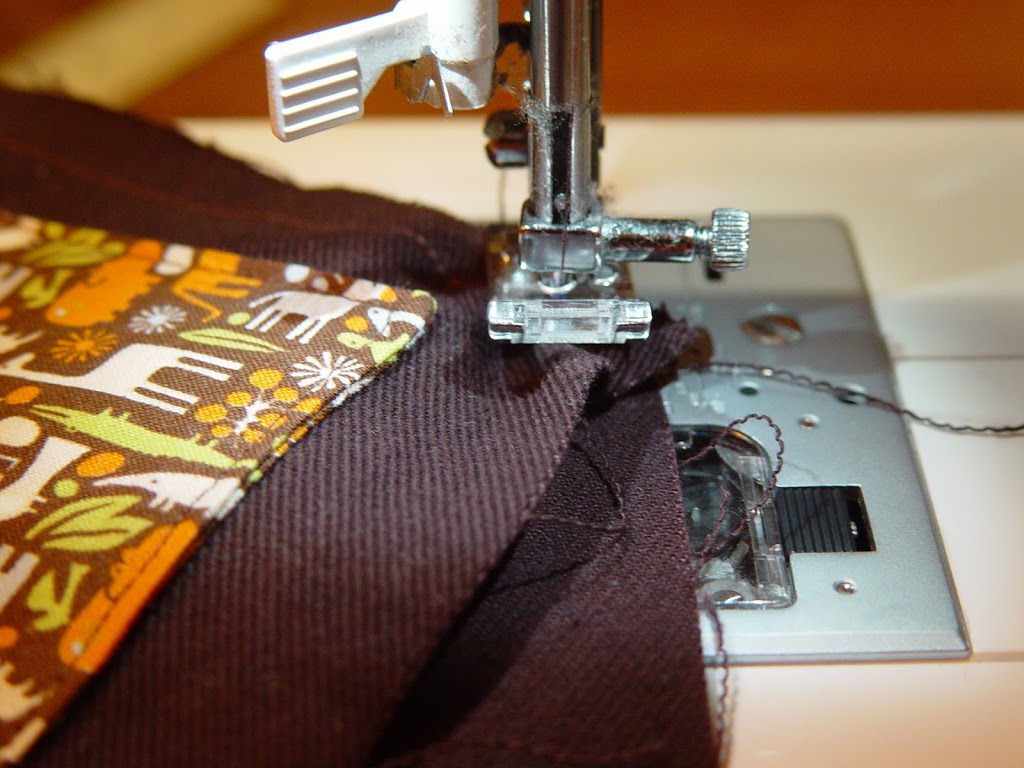
Make sure that your top and bottom fabric now line up.
Continue all the way around.
Trim some of the excess fabric away.

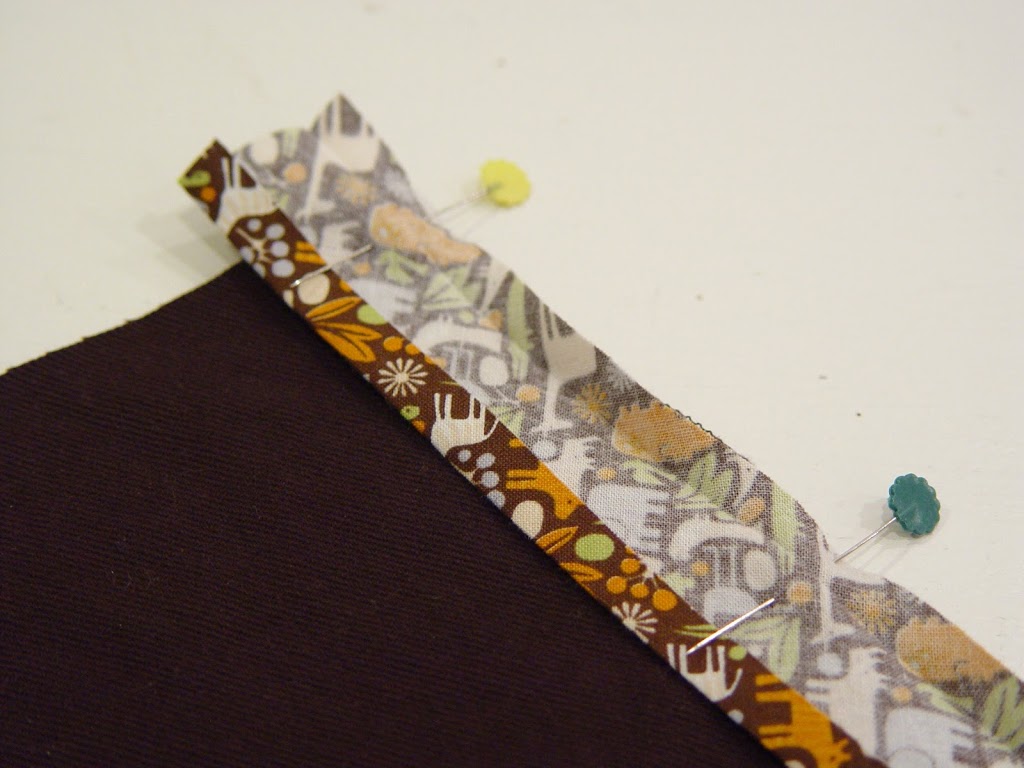
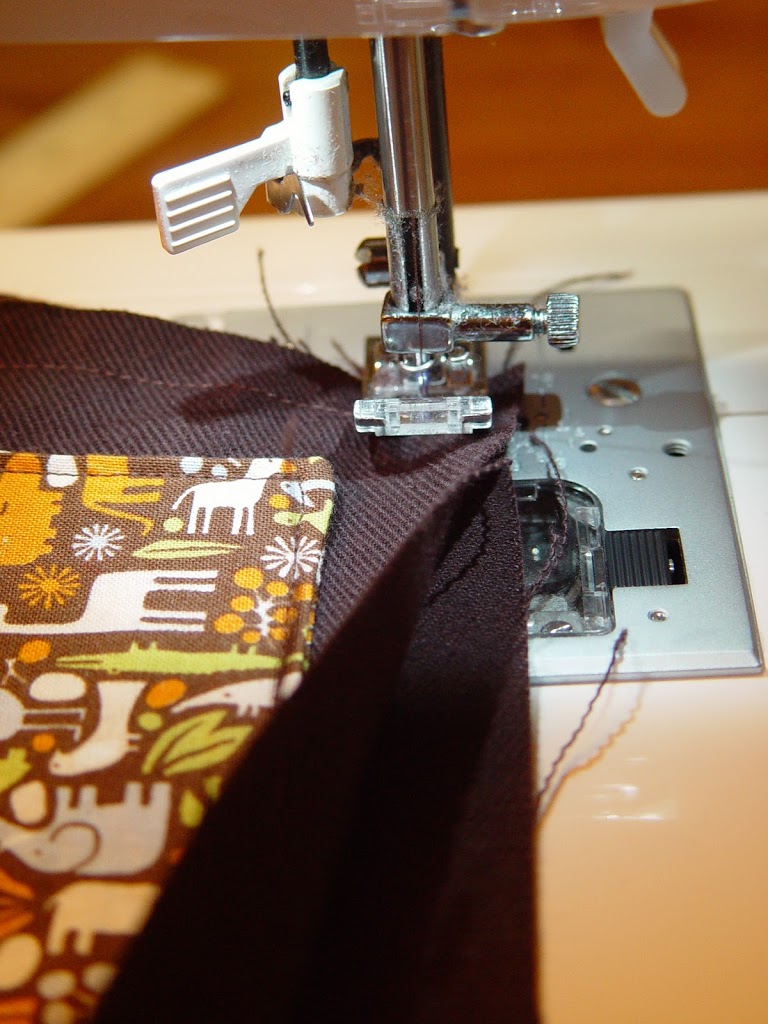
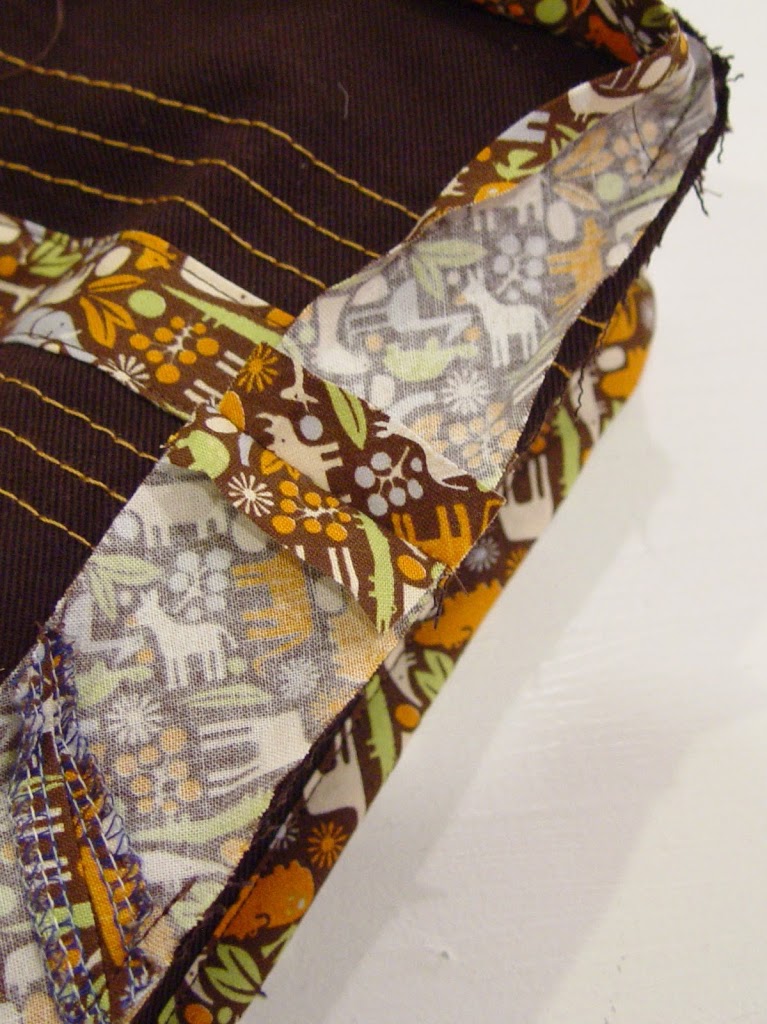
When you reach the corner, keep the needle down and lift the pressure foot and rotate your fabric. Make sure that you fold the seam binding up to the seam you just sewed.
Continue to the end, folding down a bit of seam binding at the end (again to give it a nice clean edge).
Fold the seam binding over and pin in place.
Topstitch around the seam binding to hold it in place.
Go slow around the corners to make sure you don’t pucker the fabric. It looks puckered here, but it’s actually not when it’s opened.
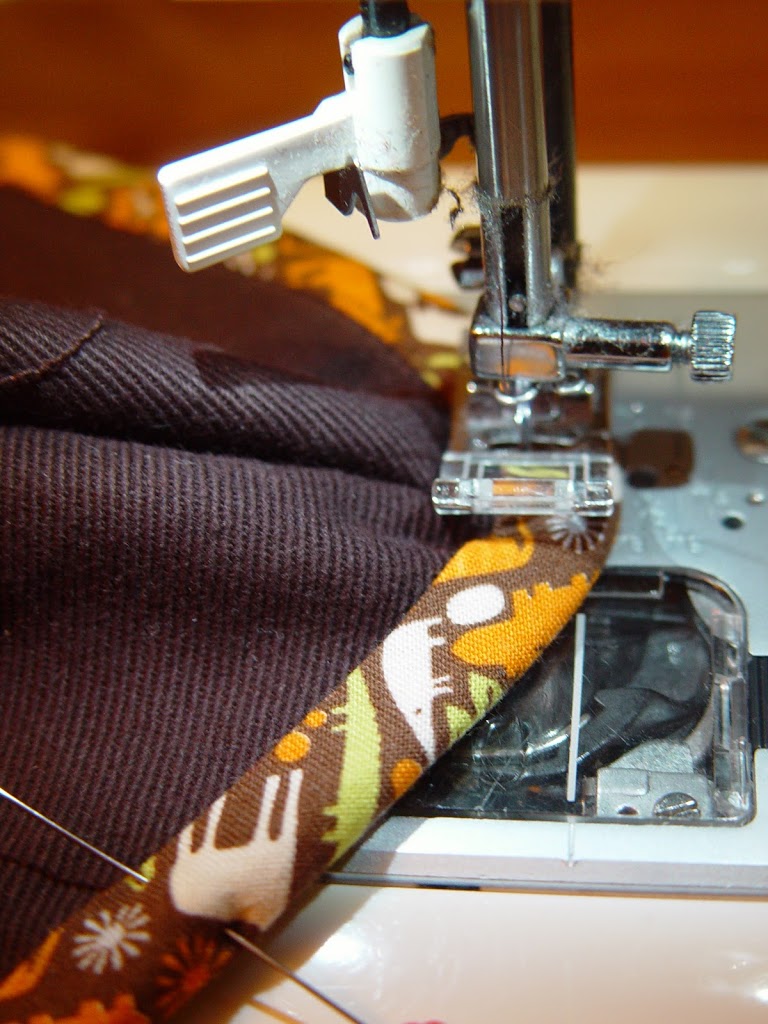
Finish stitching all the way around.
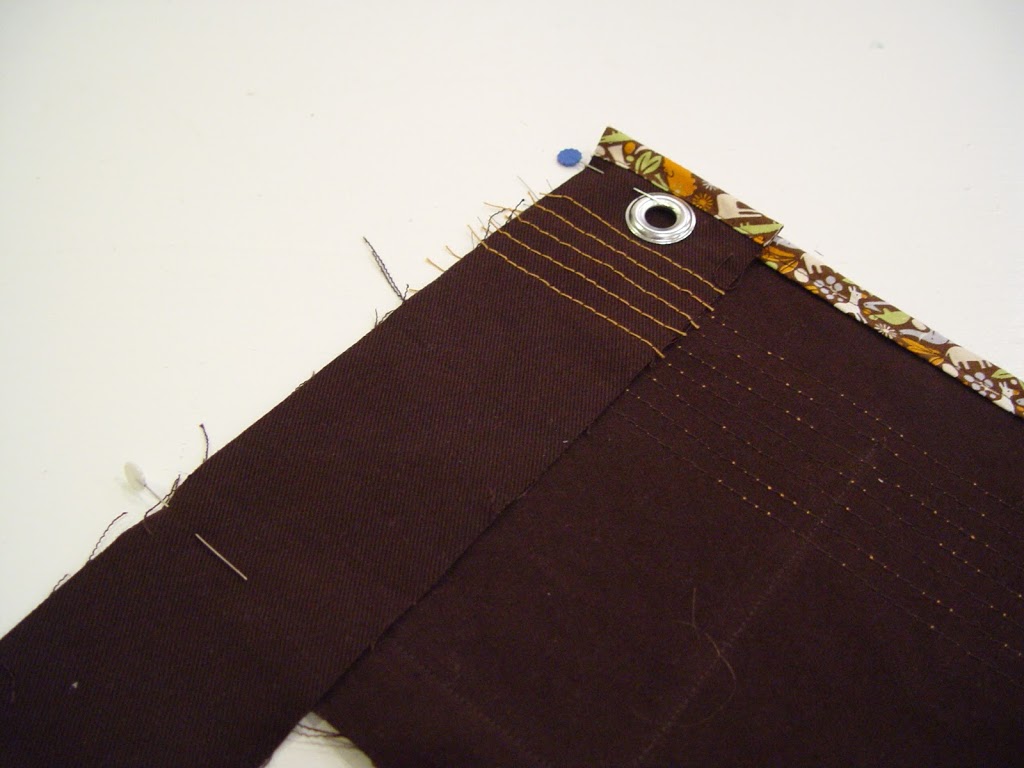
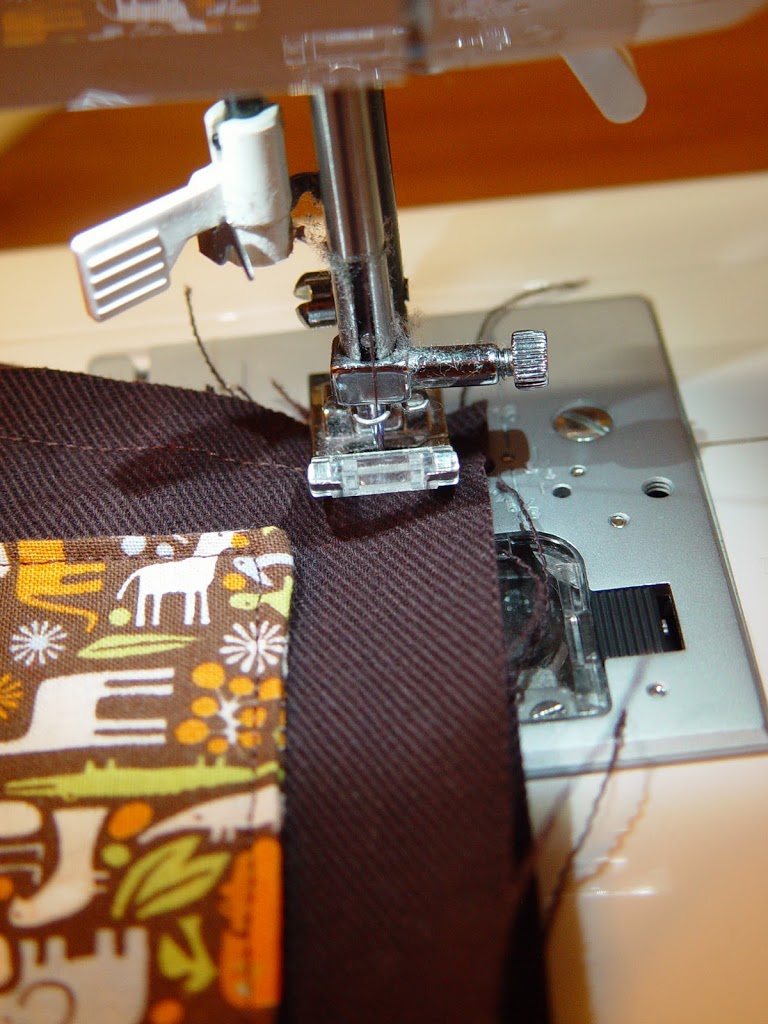
Now sew on the back/flap piece using the same method above. Don’t forget to trim the fabric around the seam line.

Now when adding the seam binding around this side, start at the bottom and leave a tail of a few inches.
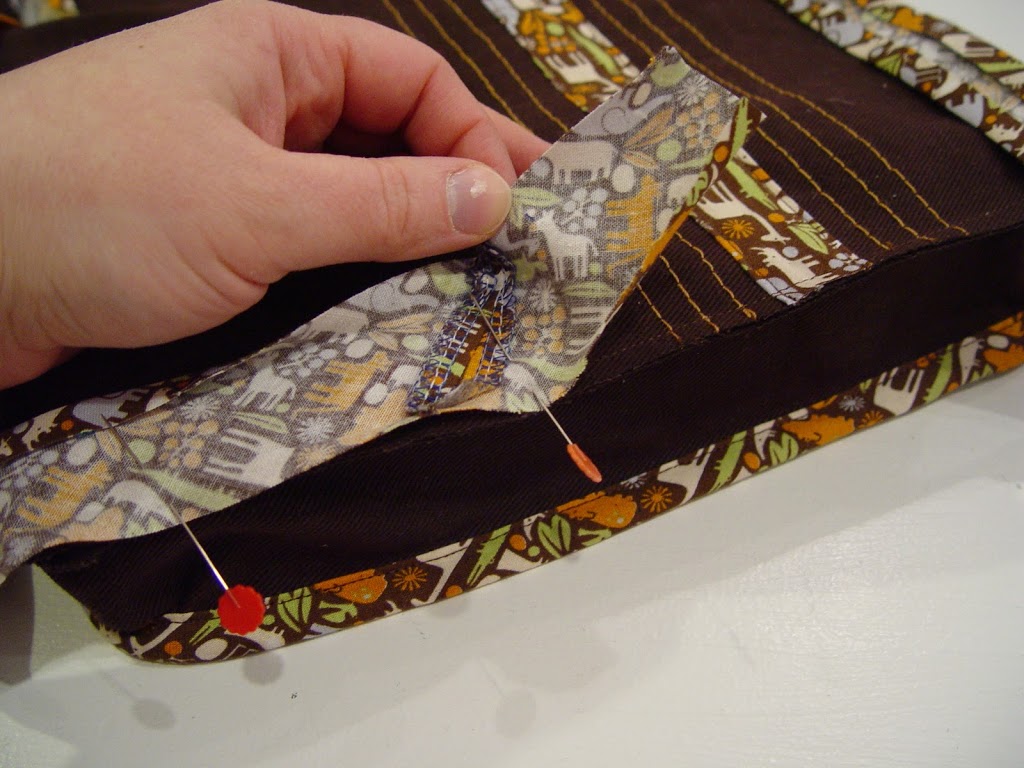
Start sewing in the ditch (a few inches in from your tail) and go all the way around. Stop a few inches before you reach the end. Lay the two tails flat and pin together.
Pull it out from the edge and sew along your pinned line.
Lay flat again and finish sewing in the fold. Then fold the bias tape over and secure in place.
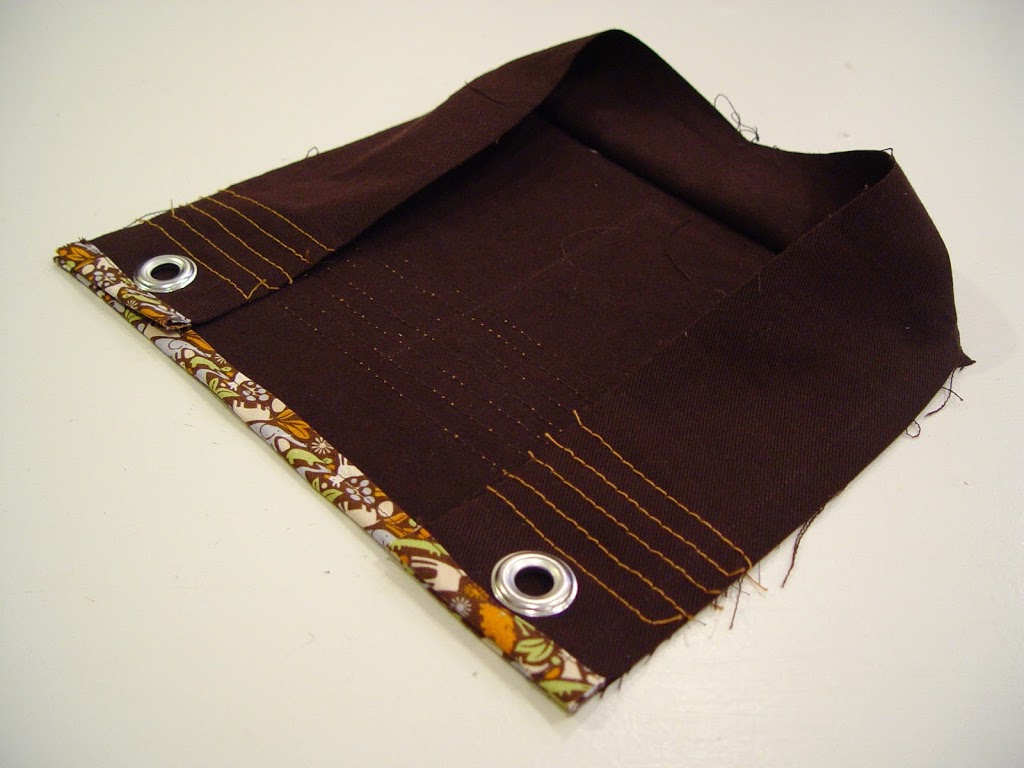
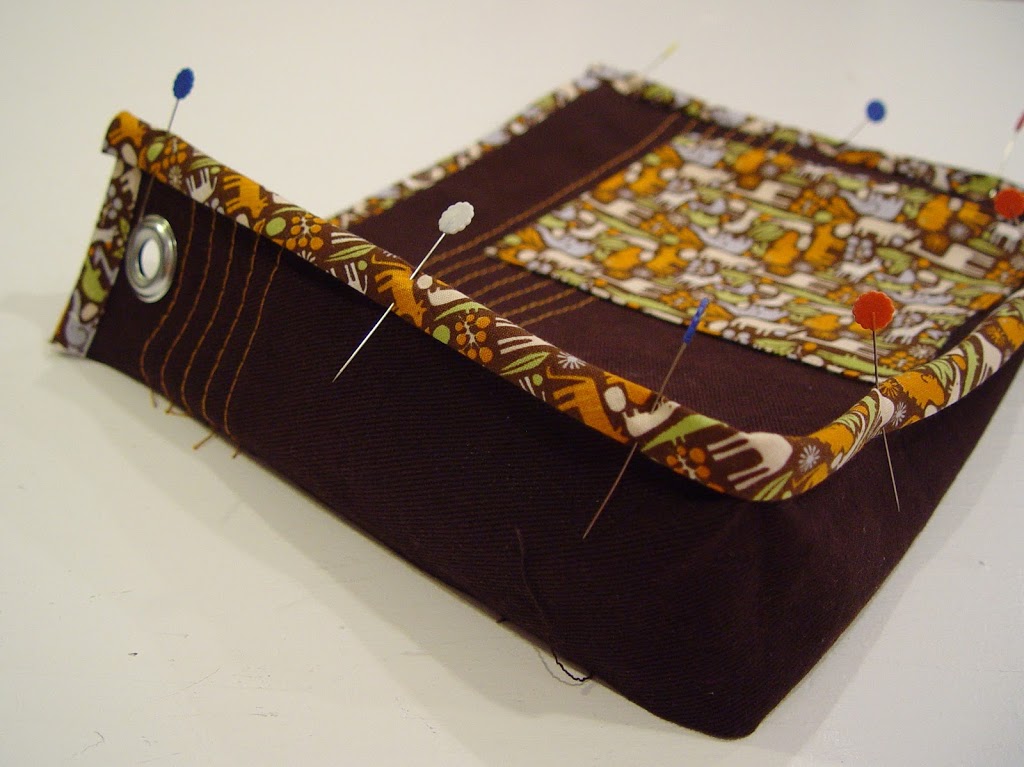
Here’s a view from the back.
I hope your little boy likes it! Please let me know if you have any questions. I’d be happy to answer them.
Final bag dimensions: 10.5″ l x 2″w x 8.5″ h
UPDATE: I’m entering this bag in the Lil Blue Boo / Dharma Trading Design Challenge!
Terms of use: For personal use only.

What a great messenger bag! Thanks for the tutorial!
Wow! I am in love with this bag!! Too bad I don’t think I could pull it off… Maybe I’ll have to gather the courage to try.
Great bag! Love all the details.
so cute vanessa, and expertly sewn as well! love the fabric choices and the details you added. 🙂
I love this bag! I can’t wait to try it out.
true that my boy would love this, but i think i have to upcycle some corduroy and make this for myself! thanks for the great tutuorial!
Looks great, but looks like a lot of work too.
I LOVE this! I would totally make it for myself as well! I bet it would make a great daddy diaper bag if it were bigger. I’m expecting a baby in a couple of months, and I wonder if I could make a bigger version for daddy to carry, and a smaller, matching version for my almost 3 year old son to carry around? He’d love it, and he could carry his own things in it, thus freeing up the diaper bag I currently use for his little sister on the way.
This is great! I love messenger bags to begin with and I love that this one is perfect for boys. I like the use of grommets as decoration. I think I know a certain sewing studio in S. Mpls that would love to have this as a class during the summer (before school starts). 😉
LOVE this! Thanks for the tute!
Just a quick note to let you know that a link to this post will be placed on CraftCrave today [23 Feb 12:00am GMT]. Thanks, Maria
This bag is FABULOUS! I cannot wait to get my hands on some grommets!
this is great! i can’t wait to try it out.
this is so great – you are a star for sharing!!!
Great tutorial! I’ve made lots of messenger bags and cut the straps down for kids, but have made most for girls. This is very boy and i love it! Thanks for posting.
It’s just awesome! Thanx for making this tutorial!
Perfect! I was just looking for a good tutorial last week for a messenger bag that doesn’t look homemade. This is it! Thank you for sharing!
Great feature post! You offer some great tutes. Thanks for sharing … I’ll be linking.
Love this pattern! Seriously great!
I love it! I tried it out and it turned out so cute! I’ll post it on my blog tomorrow 🙂
love this and thankyou so much for the tute. It is on my shortlist of make soons. Lucia
what a great bag, I’ve linked to my blog, http://www.quiltitis.blogspot.com , so I won;t loose the pattern. Thanks for sharing, Di
Great bag!
Love this! I am featuring this at somedaycrafts.blogspot.com.
Very good tutorial, I know how consuming is to put one together. Thanks for sharing.
If you only look at the pictures, it looks complicated but if you read the instructions it’s actually pretty simple! I want one for myself, I love messenger bags, specially because I have 2 little ones and I hate how the strap of a regular purse keeps falling off my shoulder. I dont need that when Im trying to put kids in their carseats! Thank you so much for this wonderful tutorial! Im gonna give it a try!
Thank you so much for sharing this tutorial with us! I know my Connor will just love it! 🙂
This is AMAZING! I want to run out and get fabric to do one right now!
This is fabulous! I can’t wait to pick up what I need to make one for my boy! How tall is your son? Just wondering if I should use the longer strap length or not. 🙂 Thanks for the tutorial!
My son is 45″ tall, but I would recommend making the longer strap and adjust to get a perfect fit!
I just finished making this for my grandson’s 4th birthday. It’s SO cute; camo, of course. My hubbym though, said, “You’re making him a purse?” I told him to think of it as a briefcase with a shoulder strap… 🙂 Blog post AFTER said birthday!
This is adorable. I want to make one for my son.
How would you line this if you were to? Thinking about making a larger version for my husband. Thank you!
Super cute messenger bag! Thanks for the tutorial….I’m going to attempt to make 1 or 2 for Christmas for my boys
I would like to thnkx for the efforts you have put in writing this web site. I’m hoping the same high-grade web site post from you in the upcoming also. In fact your creative writing skills has encouraged me to get my own web site now. Actually the blogging is spreading its wings fast. Your write up is a great example of it.
Standard Motor Products RU-576 A/C Blower Motor Switch/Resistor
I just finished mine. It turned out cute, but man, I forgot how I hate grommets!
Loved this. I saw it this morning and tried it. It turned out great! I can’t wait to give it to my lil guy when he wakes up tomorrow. The tutorial was very well detailed. Thank you so much for sharing this with us.
I had a few questions. My husband needs a bag and he really liked ur but he needs pockets and some dividers I was wondering if it would be able to add a lining to accomplish this. Also I do actions to raise money for the army family’s was wondering if I cwould use this? It would be one time oysters
very nice thank you so much ^^
Thank you so much for this tutorial. I want to make a bag for myself and this is just the kind of bag I was looking for.
Hi, I am up to the part where I sew the side piece to the front piece. I cannot for the life of me make a 27″ piece fit around 3 edges that add up to 29″ am I doing something wrong??
It should work. You’re actually sewing around a piece that is 27″ (when you take out the seam allowances). You need to use a 1/2″ seam allowance or it won’t work right. Also don’t pin all three sides before you start sewing. Just line up one side (the side you start with), when you stop 1/2″ before the corner (keep your needle down and rotate. Re-align fabrics and continue. Do it again at the next corner and you’re eliminating 1/2″ from each side and 1/2″ from the bottom (on each side).
thankyou! it worked! it was just hard for me to visualise, and i was trying to pin it all the way around first.
This looks like a great pattern, where do you get the heavy duty twill fabric from? Christina
I found it at Jo-Ann’s.
Where /what is Jo-Ann’s? I am in NSW…is there an online shop you could recommend?
Also., I have some nice fabric I’d like to use but it is patterned on one side and plain on the other….which means I need a lining for the bag. Can you help? I’ve been trying to get my head around how to do it but can’t seem to figure it out!
Would love your help!
Thanks!
Christina
Wow!
The bag is really great!
Greetz, Anne
This comment has been removed by a blog administrator.
Ella Vickers Sailcloth Collection Messenger bags (EVSC) is a selection of Recycled Sail Bags, Sailcloth totes, Sailing, Tote bags, Seabags, Duffel, Beach totes.
AAAHHHHHH!!! I LOVE the gray one!! Thank you so much for this pattern!! You’re incredibly talented! I can’t wait to try it 🙂
My kid is getting stubborn to buy Kate Spade backpack that is little expensive. Now I will follow this tutorial and make a designer inspired bag for him. Thanks for idea.
Great bag tutorial. I love the bags you have made! Thank you for sharing this free tutorial with us. I did link to your website, but wasn’t aware about the photos until later. If you have a problem with the photo, please let me know. I’ll remove it immediately.
Looks fine. Thanks for letting me know.
Adorei seu tutorial.Vou fazer! Grata!
Perfect bag tutorial. I love this handbags.
Muito linda a sua bolsa!
Pretendo fazer uma para minha filha.
Beijos e obrigada.
thank you vanessa for the amazing tutorial!
i referenced | linked to it from my blog post today which can be found here – https://myyearofmake.wordpress.com/2016/12/03/getting-my-uk-on/
best to you, and connor!
I love this bag and I am trying the make it for a friend who asked me to make him a man purse. I plan to make it bigger (maybe 15×17) I am trying to figure out how you came up with the number for the side piece. I thought it would just be the total of the two sides and the bottom.
I made this bag a bit bigger and lined with a contrasting pattern so it is reversible. I made it for a teen and he loves it thanks for the awesome tutorial.
What is the purpose of all those grommets on flap?
It’s a design element.
I just made one of these out of an old button-down shirt with a school logo. It turned out amazing!
Dear Connor’s Mom,
I’d like to make one of these and have a basic question. Are you starting with a 3″x 27″ piece that yields a smaller bag having a depth of 2″. Or are you starting with a wider piece that aims for a sewn dept for the bag of 3″.
Regards,
Kati
The final depth of the bag is 2″. You start with a 3″ wide piece and use two 1/2″ seam allowances on either side resulting in a 2″ bag depth.
This Kid Looks so cute while carrying this Bag
The House Of Tara